
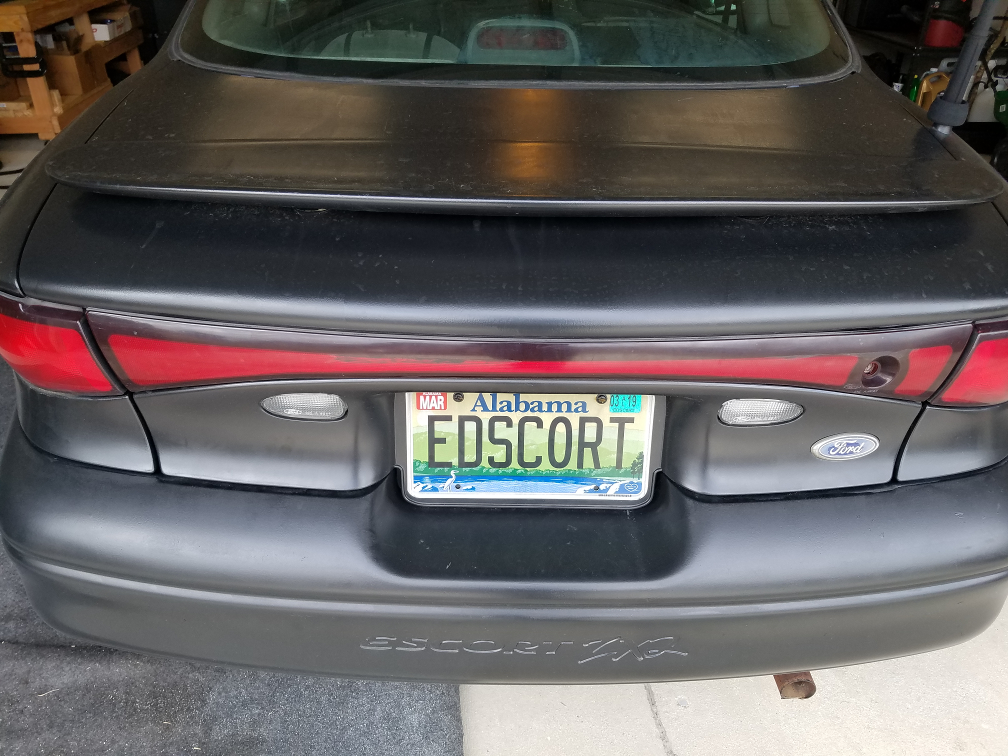
This page describes the Edscort, a 1998 Ford Escort ZX2 that I have driven since 2004. It is a 2.0 L DOHC I4 Zetec engine. When purchased, the odometer showed 200,000 miles. Around 2008, some shoddy mechanic work destroyed the original engine and I had a second engine installed from a junkyard Escort with about 30,000 miles. As of 2019, the odometer reads over 330,000 miles. The Edscort spent most of the early 2000’s in northern Ohio where the rain, snow, and salt ravaged the underside, turning much of the exposed metal to rust. And, much of the plastic is failing. As things crumble and fall apart, I fix them in my own creative ways
Below I will show photos of some of the modifications and repairs of the Edscort. I will try to present them chronologically, in the order the work was done, the best I can remember. But first, here are a few miscellaneous facts about the Edscort.
- Audio system: radio on/off button is stuck in on position so I can’t turn it off per say, but I can just turn the volume all the way down so I can’t hear it. Only three of four speakers has any sound.
- Transmission system: has had little more than transmission fluid changes since I bought it (I think one new clutch). The most reliable part of the car. The shifter bearing is completely shot and the gear shifter floats about freely so that it takes some guess work to feel if it is in gear.
- Engine: currently no problems other than a little oil leak from the valve gasket. As stated above, it is the second engine though.
- Braking system: “custom” rear brake lines (described below). Parking break cable is not attached because the parking breaks are seized in the rear drums. When I park on a hill, I have to chock the wheels or the car will roll backward (into the the street for instance, it has happened).
- Windshield: currently has three substantial cracks, all on the driver’s side of course. Let’s hope they don’t grow together.
- Crash protection: in 2018 I destroyed the front of the car in a crash and none of the airbags deployed, so I guess those aren’t working. Seat belts are holding up, though.
- My local mechanic has refused to do any more work on the Edscort, partly because he thinks it’s a waste of time, and partly for safety. He is worried the rusted frame will not support the weight of the car when raised on the car lift.
- My partner refuses to ride for fear of her personal safety.
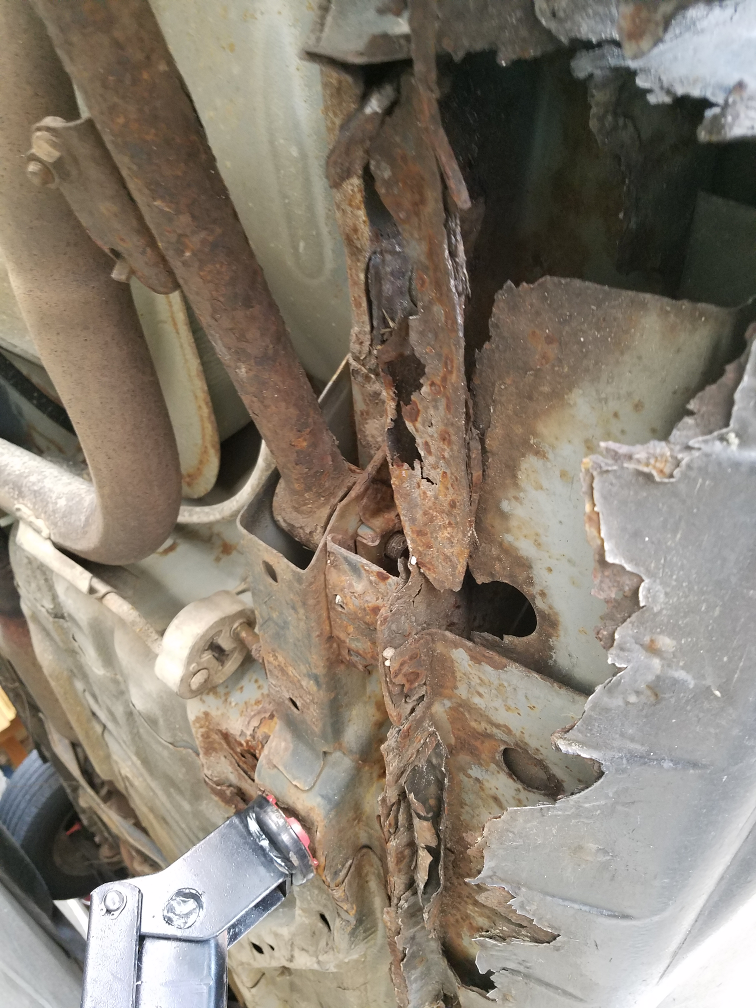
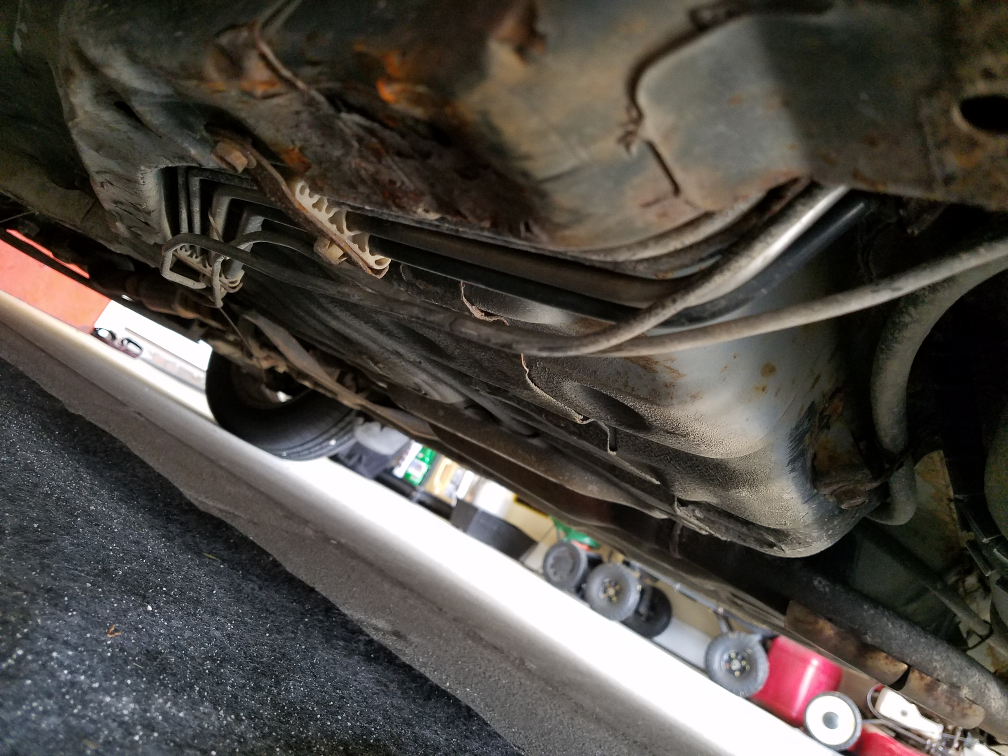
This is a good photo to start with as it shows the general situation on the underside of the car. Rust damage is severe, to both the body panels and the frame. I found a place for my jack, but it’s half a meter away from the ideal spot where the frame has caved in.
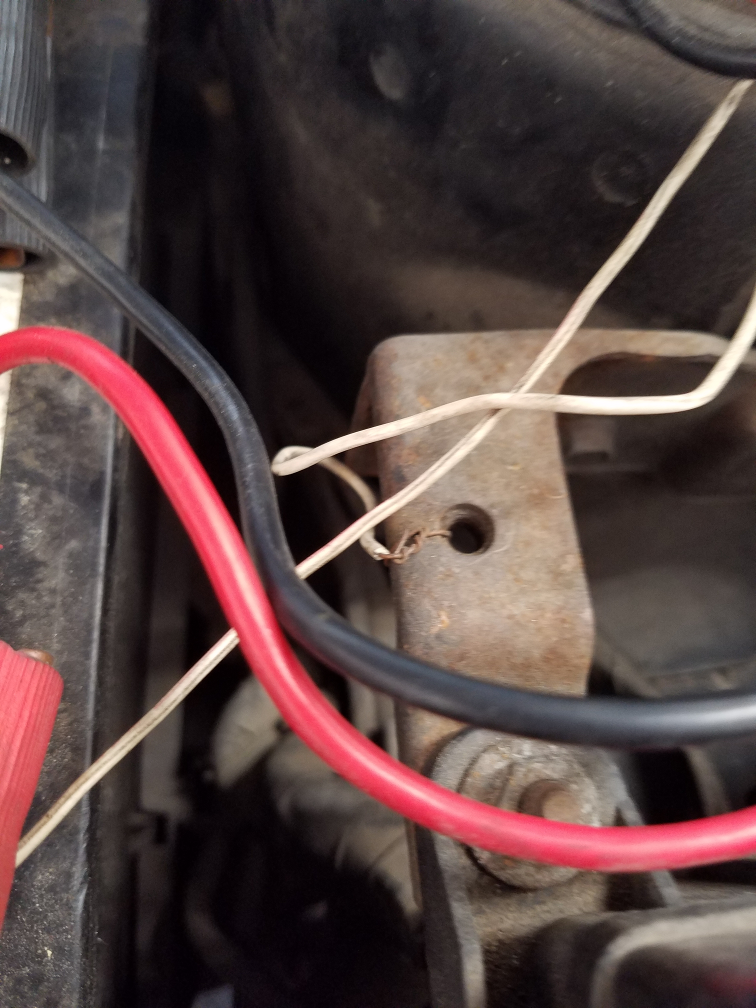
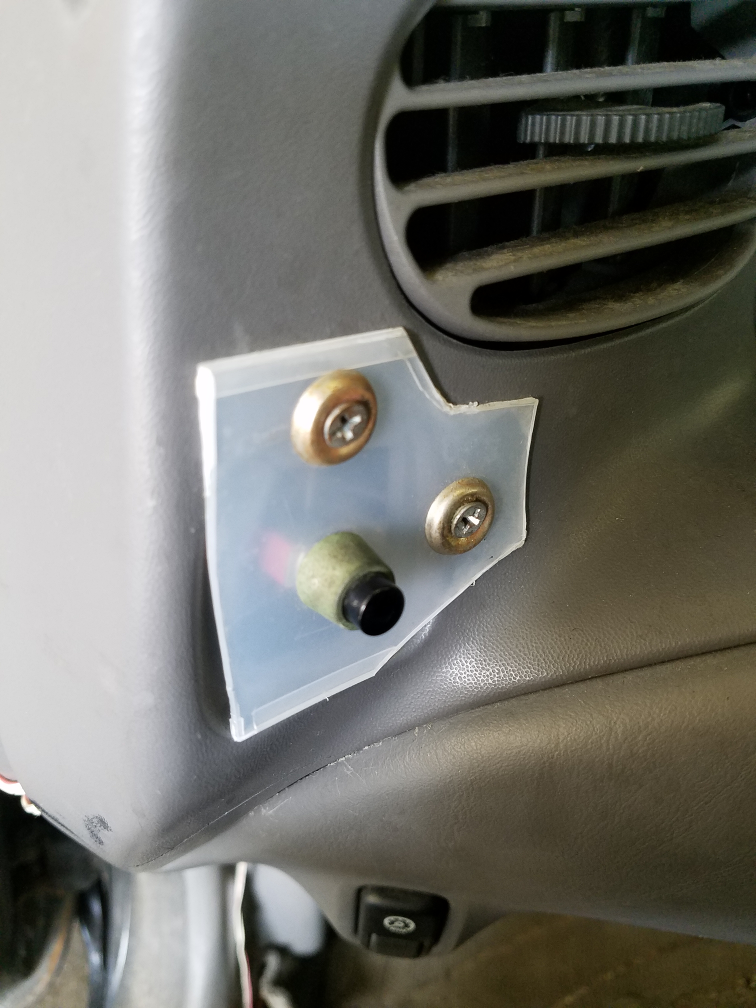
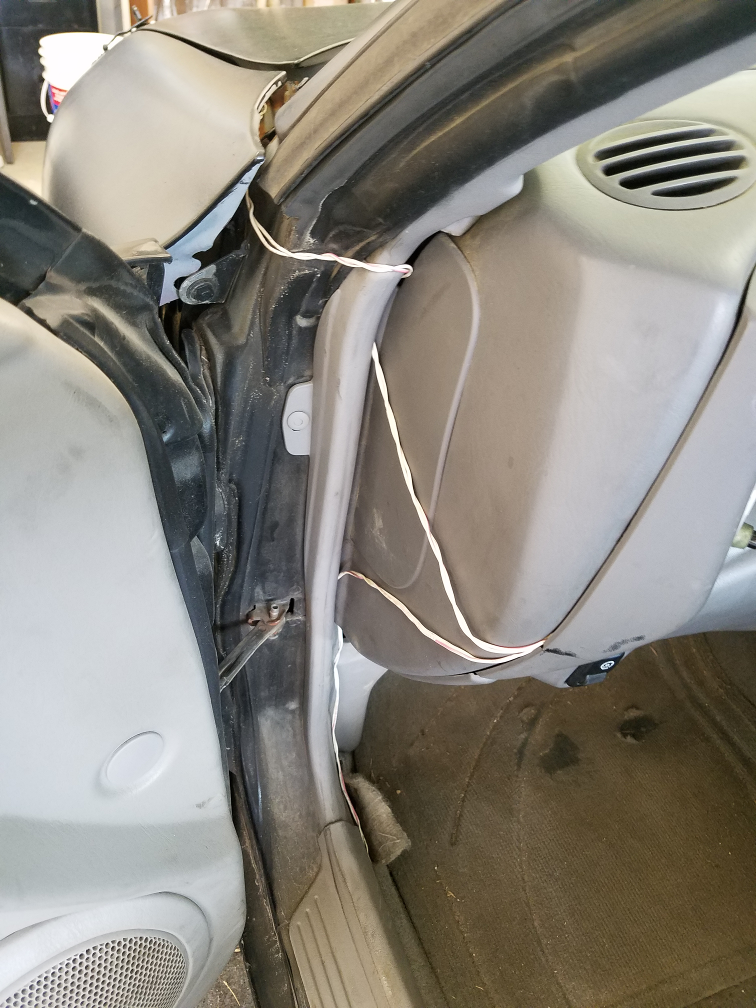
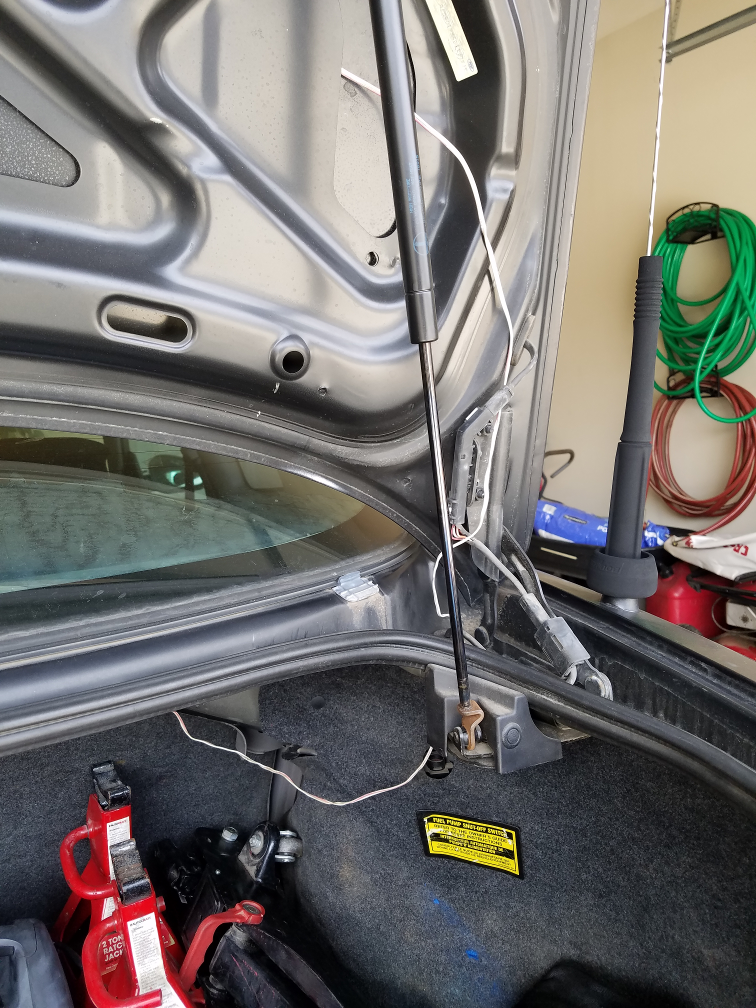
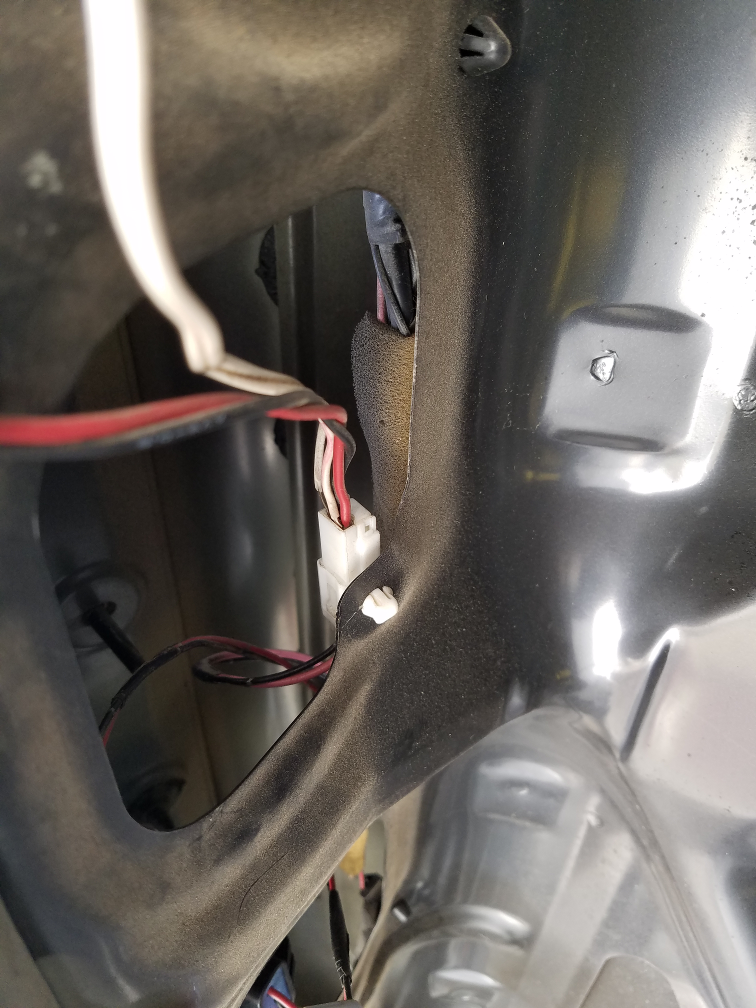
When I bought the Edscort, I was given a key fob that would lock/unlock the driver’s side door and the trunk. I soon learned that the metal key does not fit the trunk lock. Soon the key fob was failing so I had to I decided to wire the trunk lock solenoid to a push button on the dashboard. In the photos you can see the two white wires running from the battery to the trunk. One wire is held tight at the positive battery terminal. The ground wire is twisted around a piece of metal in the engine compartment. The dash didn’t have a flat place to mount the switch so I cut a sheet of plastic from a CD case and screwed it into the dash, to the left of the steering wheel. In the trunk, the wires are inserted into the existing connector for the solenoid. The modification has been perfectly acceptable and has provided an easy means to open the trunk for many years.
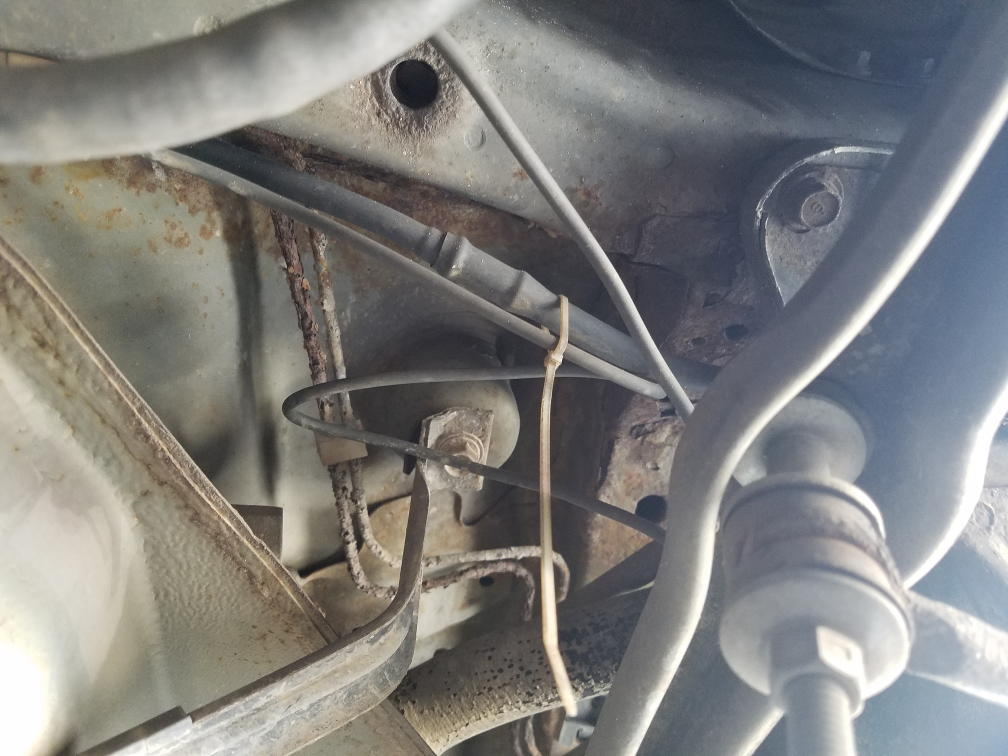
Around 2008 the rear brake lines rusted completely through. Upon inspection, I found they crumbled when pinched between fingers, so it’s really a miracle they were still functioning at all by that point. Local mechanics I visited declined to replace them. The lines are run behind other parts that are also affected by rust. The concern was that removing those parts to access the brake lines would just create more expensive-to-repair damage. Actually, I found one backwoods mechanic who said he would do the job for $800 cash if I agreed not to tell anyone and if there was no paper trail. He was worried that some other part of the braking system would fail and he would be blamed for the work on the brake lines.
With no good options, I decided to replace them myself. I heeded the concerns of the professional mechanics and left the original lines in place tucked behind the occluding components. I simply disconnected them from the master cylinder and from the rear brake cylinders. Then I ran new lines from front to back fully exposed. The weight is supported by zip ties but they are stiff enough that the connections at each end mostly hold them in place. I opted for coated steel lines and I expect them to last longer than just about everything else on the car. I did the whole job in a few hours in the parking lot (gravel!) after work one afternoon. The flaring tools and new lines set me back about $200 and I’ve since repaired someone else’s brake lines in a similar way, so it was a good investment.
The new lines are now the lowest hanging component under the car. This turned out to be a slight problem as I developed a hole in one line probably caused by the line hitting something tall in the road. I had the hole fixed and then slipped plastic tubing over the most vulnerable areas. Since then I’ve had no issues, and even if I do, I still have my flaring tools.
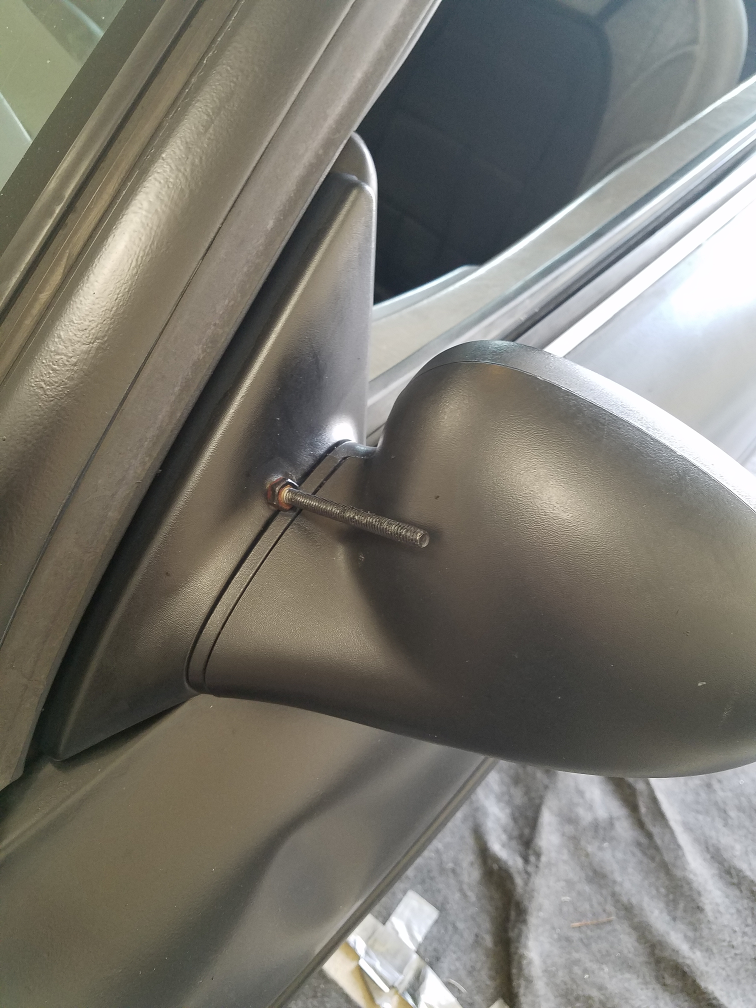
This is a fun one. One morning while leaving the parking lot at the apartment complex, I went over a speed bump and my driver’s side mirror fell right off. There are three screws that hold the mirror to the door and each screws into plastic mounts. All of the plastic mounts had broken. I guess the plastic just weakens over time. I used a drill to drill a new hole through the door and mirror and reattached the mirror with a screw and nut. As you can see, I significantly overestimated the necessary screw length when buying one from Home Depot. I had plans to cut off the excess but never got around to it. Now I think it adds too much character to change.
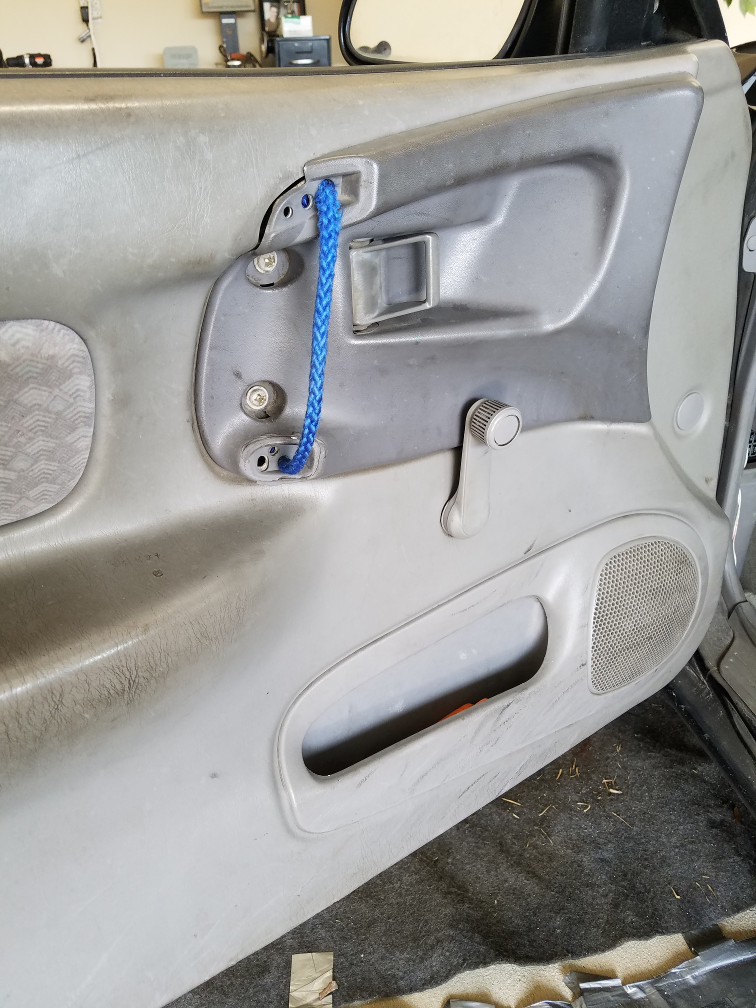
This one has a similar story as the last photo. One day I closed the door and the door handle came off in my hand thanks to crappy broken plastic. Another easy fix though. The blue rope is tied off inside to the handle support (metal).
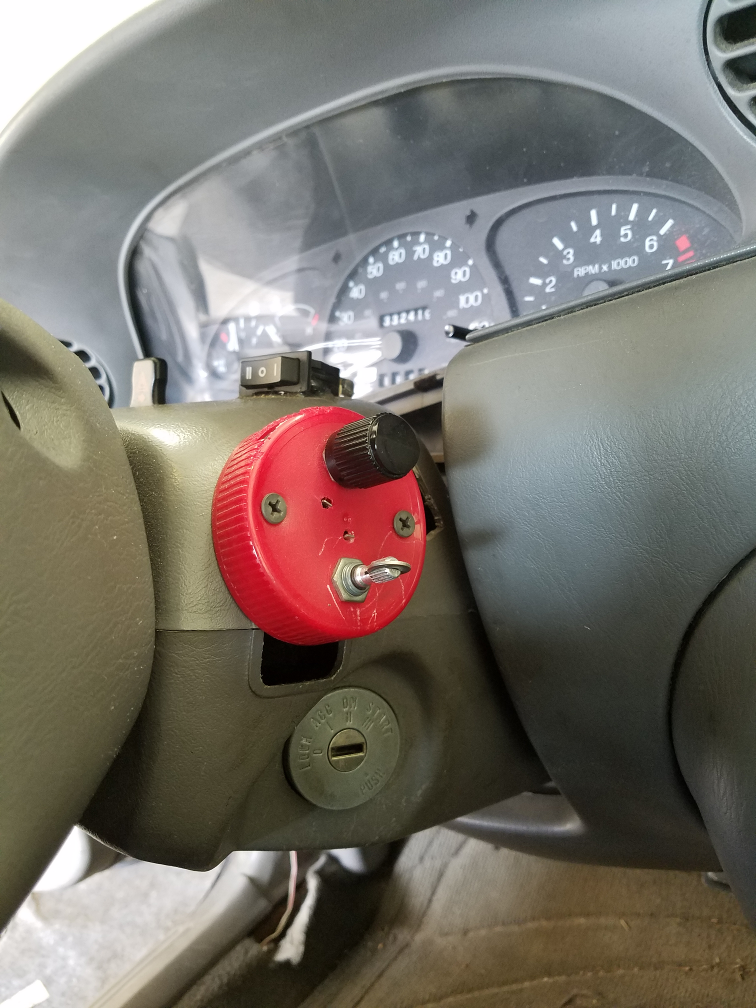
I’m quite proud of this modification as it took a bit of puzzle-solving to design. I applied a little too much force to the wiper control handle (name?). It was a long black plastic handle coming from the steering wheel. All of the switches still worked but the whole thing was dangling from the steering column by the wires. I decided to rebuild all of the functions of the wiper control instead of buying a new one ($!) or trying to repair the break. There is a description on this site of that project.
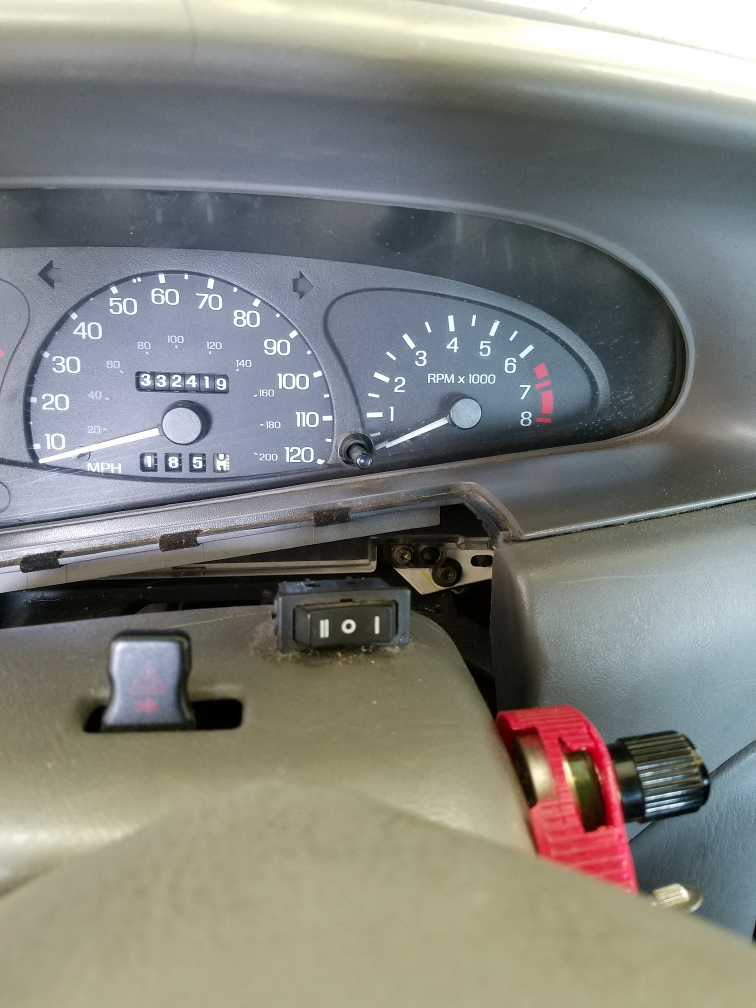
In brief: the black three position switch on top of the steering column has two functions. Pushing and holding the || position runs the wiper manually. The | position triggers the windshield wash to spray and runs the wiper. The small silver switch at the bottom of the red plastic mounting surface controls the wiper speed and has four settings: off, intermittent, fast, fastest. The speed on the intermittent setting is controlled with the potentiometer mounted above. Actually this is an improvement over the old switch that had about 5 positions for the intermittent setting. Now I have full analog control.
There are a couple fun quirks unrelated to function, too. The red mounting surface is the plastic lid from a jar of peanuts. In retrospect, while this was convenient at the time, it is now falling apart because plastic and sunlight do not mix. You’d think I would have learned this lesson already. The red lid is attached to the steering column with black drywall screws because that’s what I had at the time. The black switch on top of the steering column is hot-glued in place. I can’t believe it’s still holding. Finally, I couldn’t find a knob for the small silver rotary switch at the bottom but I found a dime fit into the slot on the switch post and provides enough gripping surface to turn the switch easily – a perfect 10 cent solution.
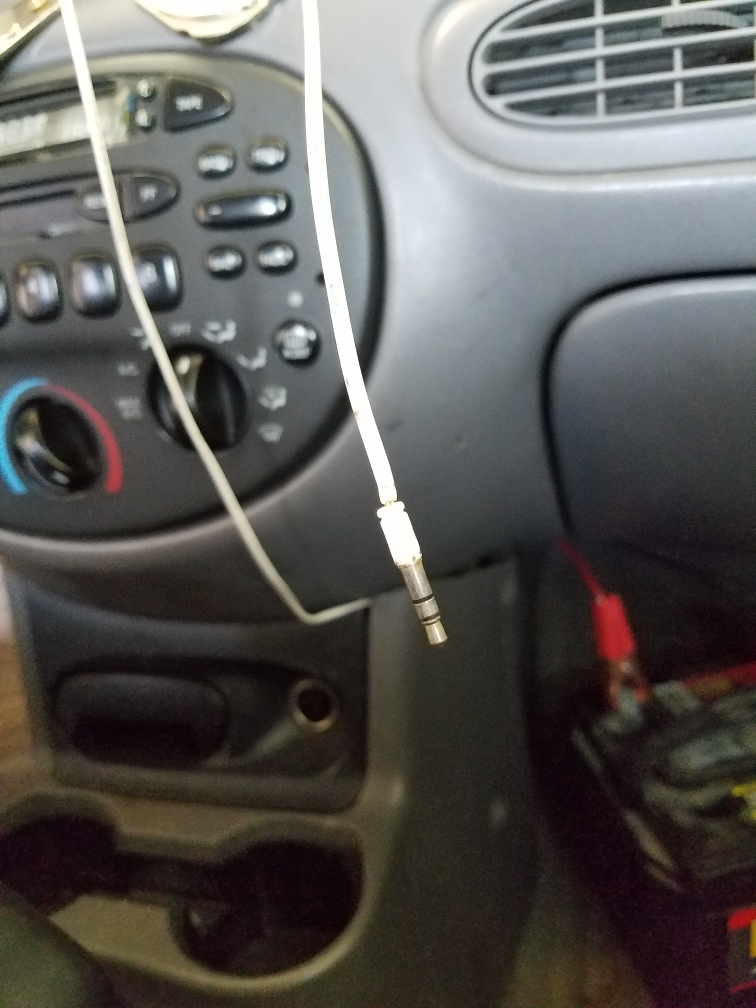
The Edscort only came with a cassette tape deck. CD players were options at the time but no one had auxiliary inputs because portable audio players, other than CD players, didn’t really exist yet. But as technology improved, I wanted to modernize. The white audio cable runs inside the stereo. By some mostly random prodding around, I found contacts on the stereo’s circuit board where I could inject an audio signal. Miraculously, when an audio signal is applied to the white cable, the radio signal stops – there is no mixing of radio and auxiliary audio. At least, that’s the way it was working. These days, the cable has no effect and no longer works. Either this method of injecting audio caused some kind of circuit damage or one of the contacts has become unsoldered. Probably it’s not the former since the radio is still working fine
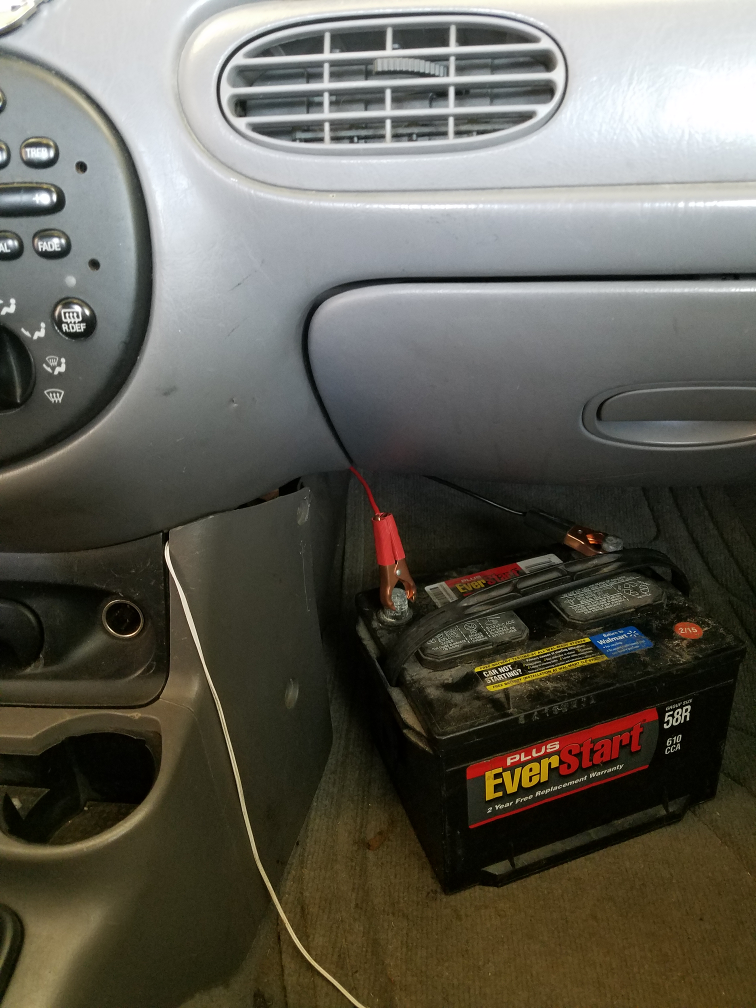
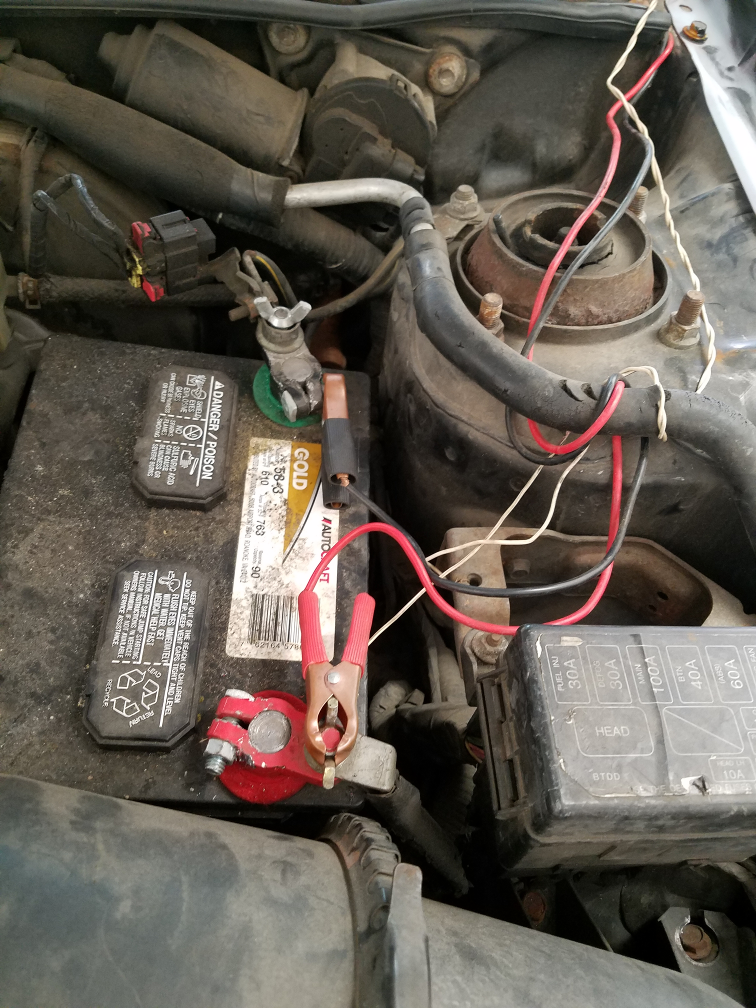
You may have spotted this one in some of the previous photos. This explanation requires a story. I was making the roughly 4 hour drive between Tuscaloosa, AL and Mobile, AL (I go the long way) at night when my alternator died. I still had about 1.5 hours left on the trip. If I stopped, I would have had to get a hotel and wait for the next day to get to a shop. I decided to try and make it back to Mobile on battery power but I also knew that the battery probably wouldn’t last the whole way. I made a quick stop at Walmart and bought a spare battery and some leads with alligator clamps at both ends. I ran the leads from the engine compartment to the floor space of the passenger’s seat – the farthest they would reach. As predicted, about an hour further down the road the engine began to stutter as the original battery was running out of power. I pulled over and before the engine could die, I connected the leads to the new battery on the floor. The fresh battery got me the rest of the way home.
For the next few weeks, I drove without a working alternator by charging these batteries using an external charger and swapping them as needed. After I replaced the alternator (another afternoon in the parking lot at work), I kept the spare battery. It turns out the battery is not the right fit for the Edscort (woops) so it will remain an in-cabin spare. Normally the battery sits disconnected (actually in the trunk). It is connected in this photo because on this particular day it was in operation. My serpentine belt had broken so I was driving around again without an alternator (or power steering).
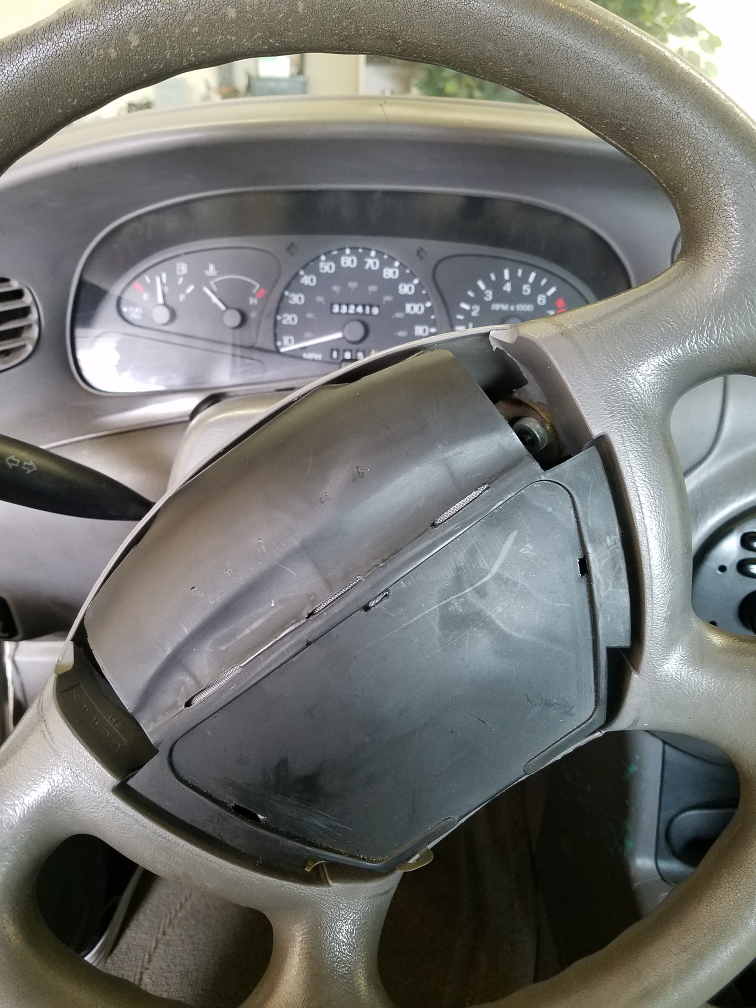
What you are seeing here is the steering wheel with the front cover removed and horn switch removed. The black plastic holds the air bag. This one also has a fun story. We’re now at about 2017. The Escort was sitting in the parking lot at work on a hot afternoon. I went to the car to make a phone call and during the call, the horn suddenly came on by itself. After repeatedly smashing the steering wheel it turned off. After apologizing and finishing my call, I left the car to go back into work. When I closed the door, the horn came on again. Now I was angry (and embarrassed). I opened the door and then kicked the steering wheel until the plastic cover split, but the horn stopped. Then I returned to work, or tried to anyway. I got about 1000 ft away when the horn came back on. I decided to end its life. I tore away the plastic on the steering wheel and cut the switch out with my pocket knife. I have been meaning to replace it. You don’t quite get the same reaction when you stick your head of of the window and yell “BEEP! BEEP!”.
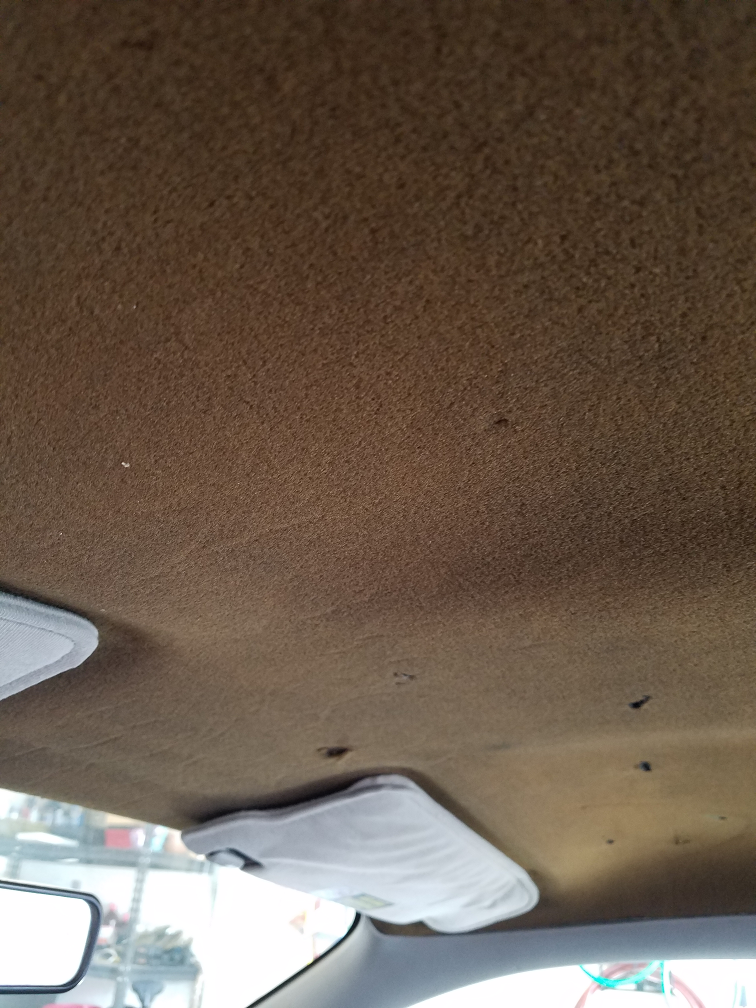
Headboard liners. At some point, they all start to come unglued and droop. When this happened the first time, I pulled out the headboard and used spray adhesive to put it back in place. Then I spray painted the gray fabric black. It was very cool. When it began drooping again in 2018, I just ripped the fabric liner off. What’s left is the brown colored foam which looks terrible but at least will never droop. I am considering to remove the headboard completely but I’m not sure if that will introduce too much road noise. Still, expect a future entry on this topic.

This is what the Edscort looked like after a crash in May of 2018. The collision included a front-end impact with a telephone pole. The bumper and radiator support were smashed in toward the engine. There was significant damage to the unibody frame. My mechanic told me the damage was too extensive to fix. Nonetheless, I had it towed back to the house where I spent the next six months fixing it myself. The next few photographs repairs I made.
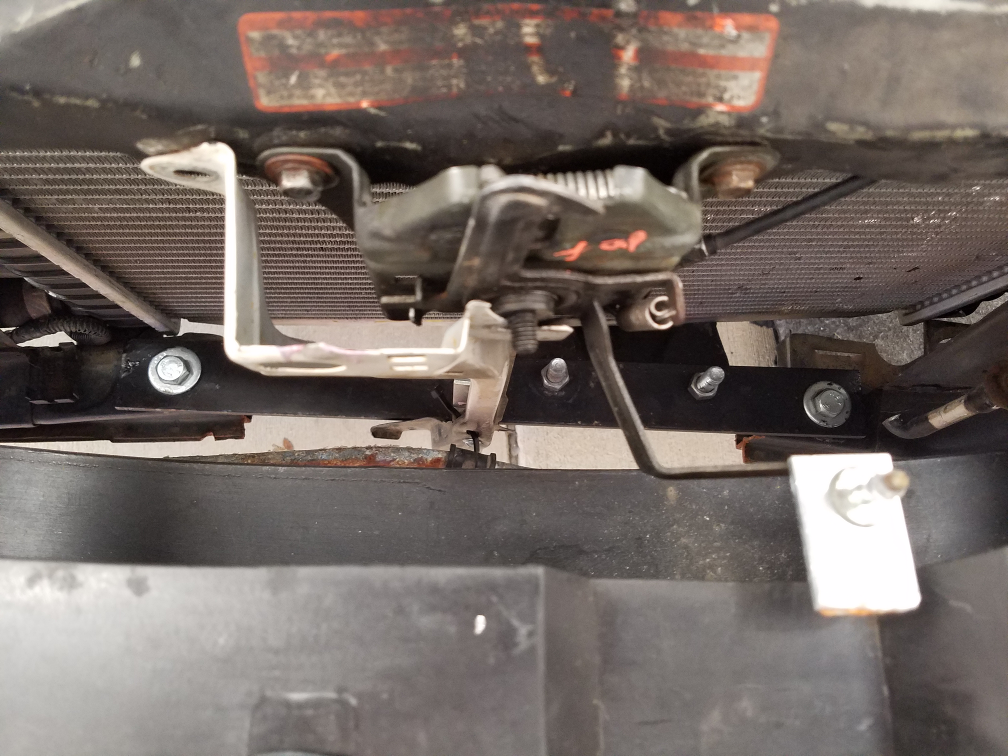

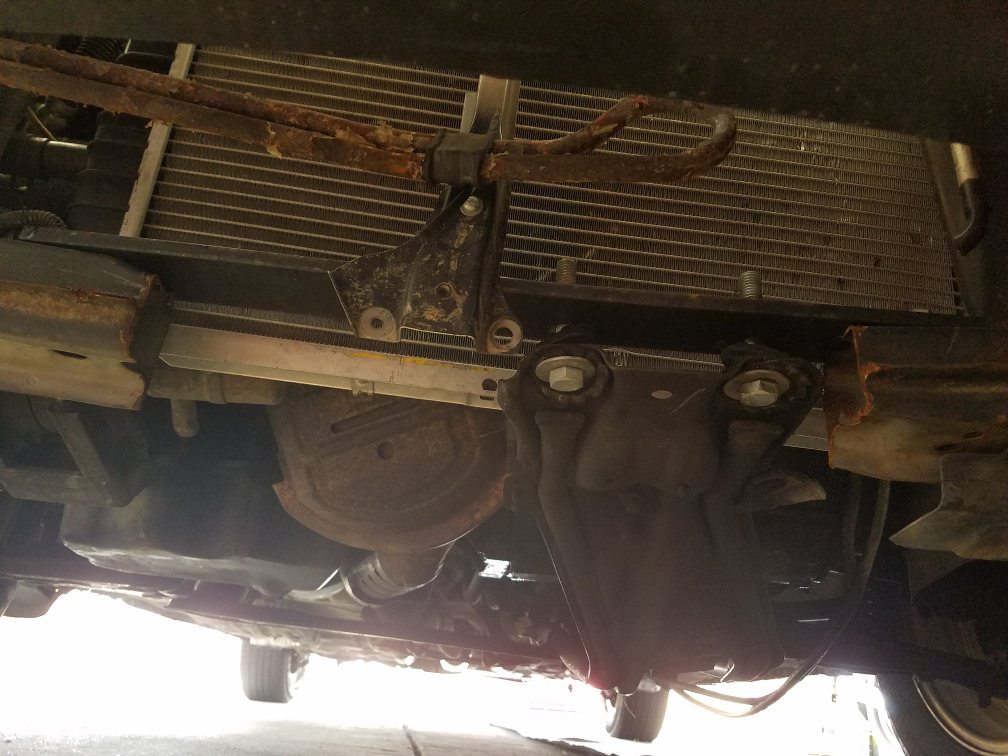
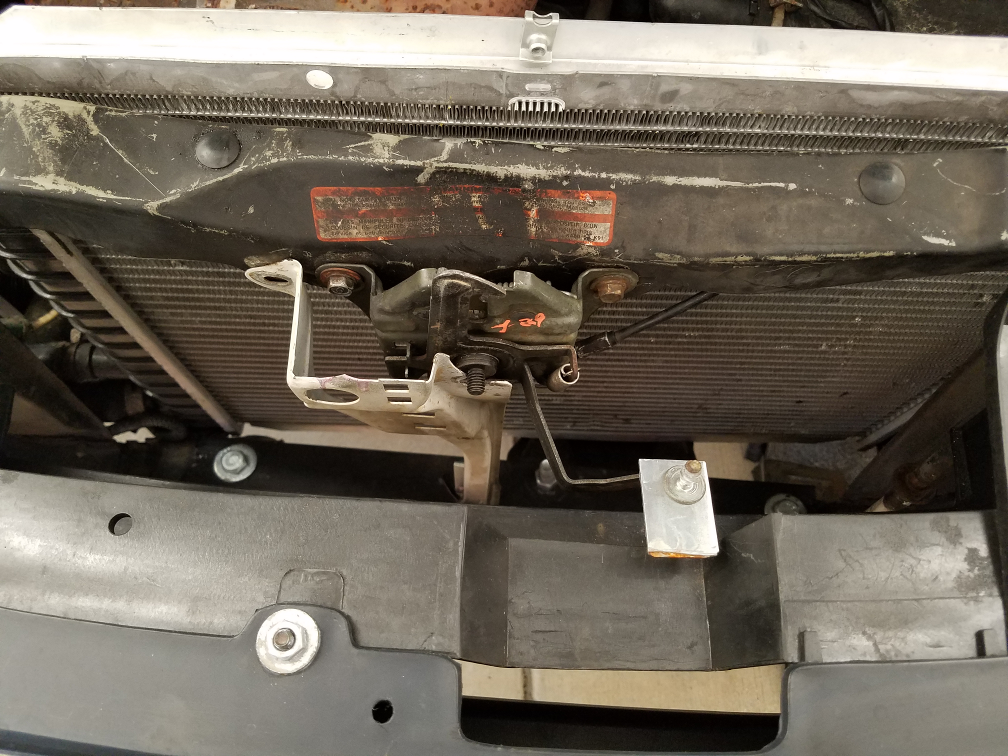
The most significant work was to replace the radiator, replace the thermostat housing, bend the radiator support back into shape, replace a damaged section of the radiator support, and replace the hood latch. The radiator was mostly a simple fix except because the front end is now a little compressed, there is no room for a radiator fan. I have suspected for a long time that the radiator fan wasn’t working anyway, so I just left it out. The engine temperature hasn’t been affected, according to the thermostat reading. Normally, the radiator sits on two lower supports and is fixed at the top to the radiator support. Because the support couldn’t be straightened perfectly, the radiator could no longer be fixed at the top. So, it is just sitting in the cavity on the lower supports. It might wobble around some, but it’s not going anywhere. There is no longer enough space for the AC condenser, so I cut out the damaged one and didn’t replace it. The Edscort has not had working AC since I bought it in 2004, so it was only dead weight anyway. One of the photos shows a coolant tube I had to cut to get the condenser out since I didn’t have the right tool to disconnect it.
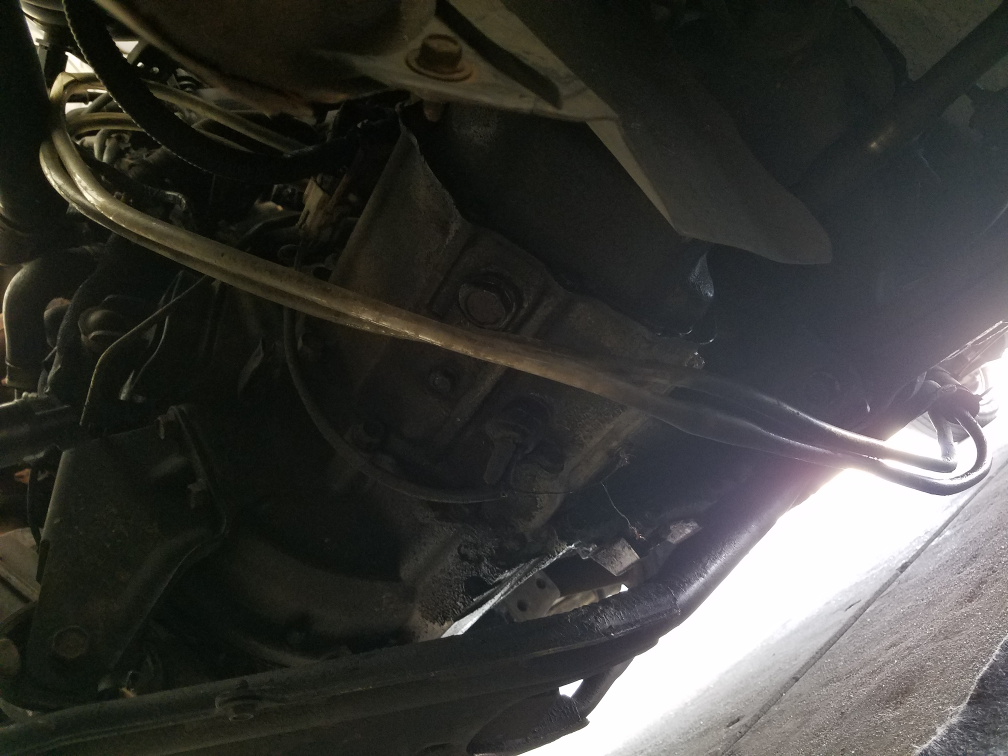
While the top of the radiator support could be pried with a crow bar, the lower horizontal beam was too stiff for me to pull it back straight. The bent beam was preventing me from putting in a new radiator, so I cut out the bent section. Bolted to this section was a thick metal plate that runs under the engine which I guess helps hold the weight of the engine. This seemed important, so after the horizontal beam was removed, I put a piece of 3 inch wide, 1/4 inch thick steel in its place and bolted this under-the-engine plate back in place. In the above photos, you can see the new piece of steel plate if you look down past the hood latch. There is also a photo taken from under the car to show the under-the-engine plate.
The photos also show the replacement hood latch. It serves a mostly aesthetic purpose now, though. The latch sits a bit too low such that when the hood is closed it only catches the first position (safety catch) but not the fully secured position. It also sits far enough back that when the hood is “popped” my fingers were too short to reach under and trigger the hood release. So, you will see that I have extended the release level with a short piece of steel
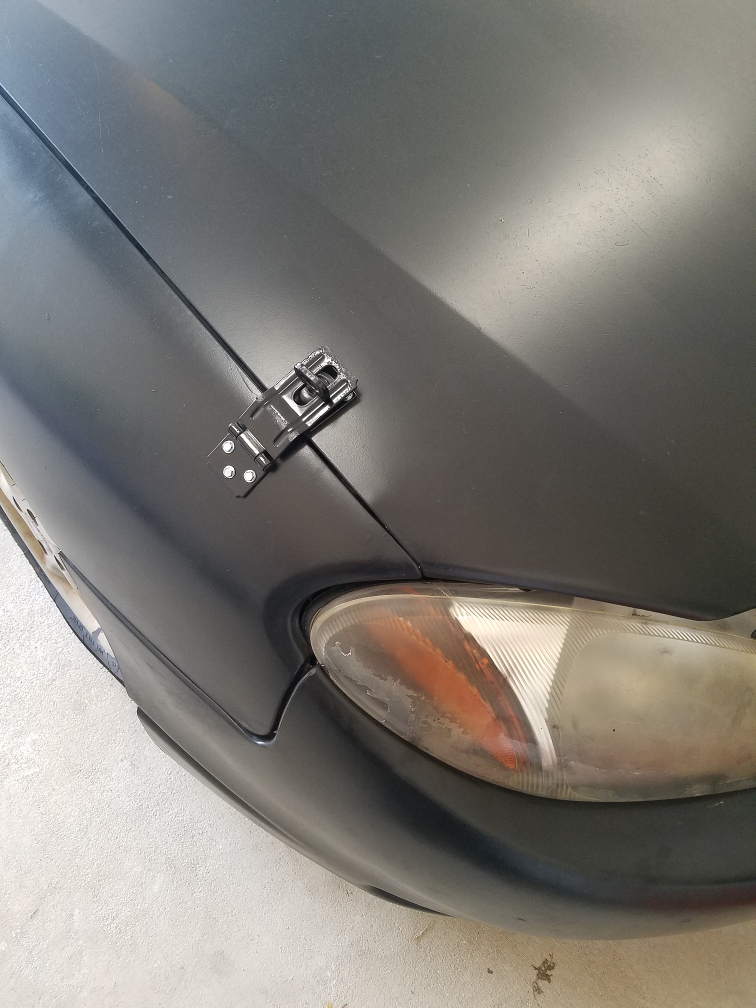
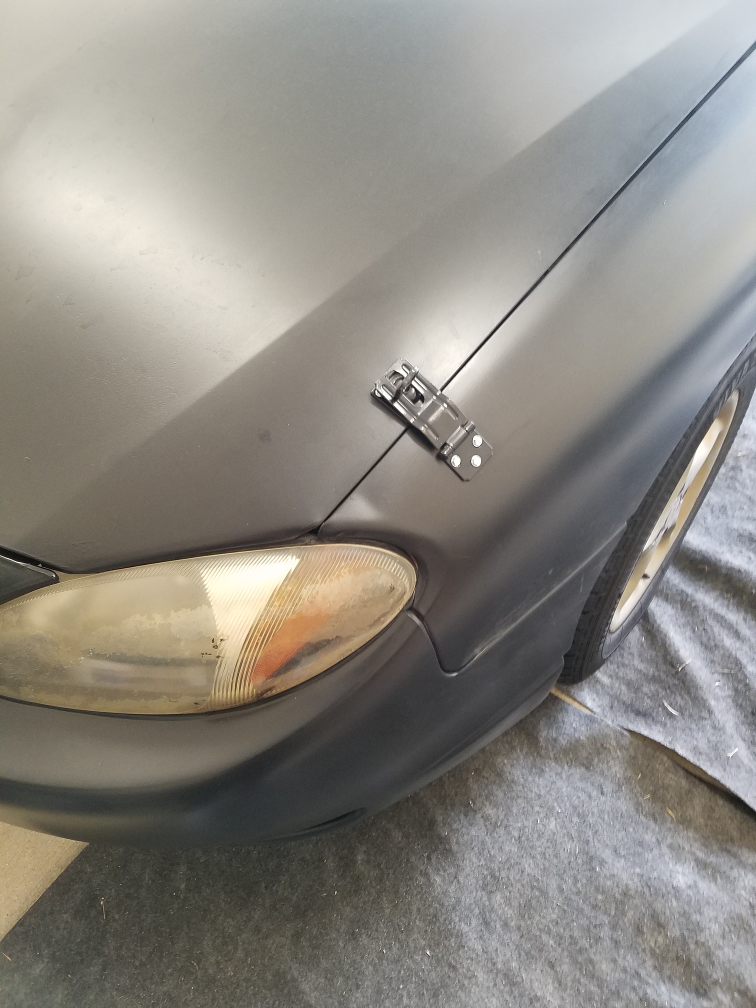
Since the hood doesn’t catch in the fully closed position, it stay’s always in the “popped”, partly open state. While driving down the road, the hood would bob up and down with the wind and seemed like it might fly open at any minute. To safely secure the hood I bolted some latches on either side. Very stylish, I must say. These photos also shows the new hood, headlights, bumper cover, and quarter panels. All are junkyard replacements except the bumper cover. Underneath the bumper cover is a new metal bumper, too.
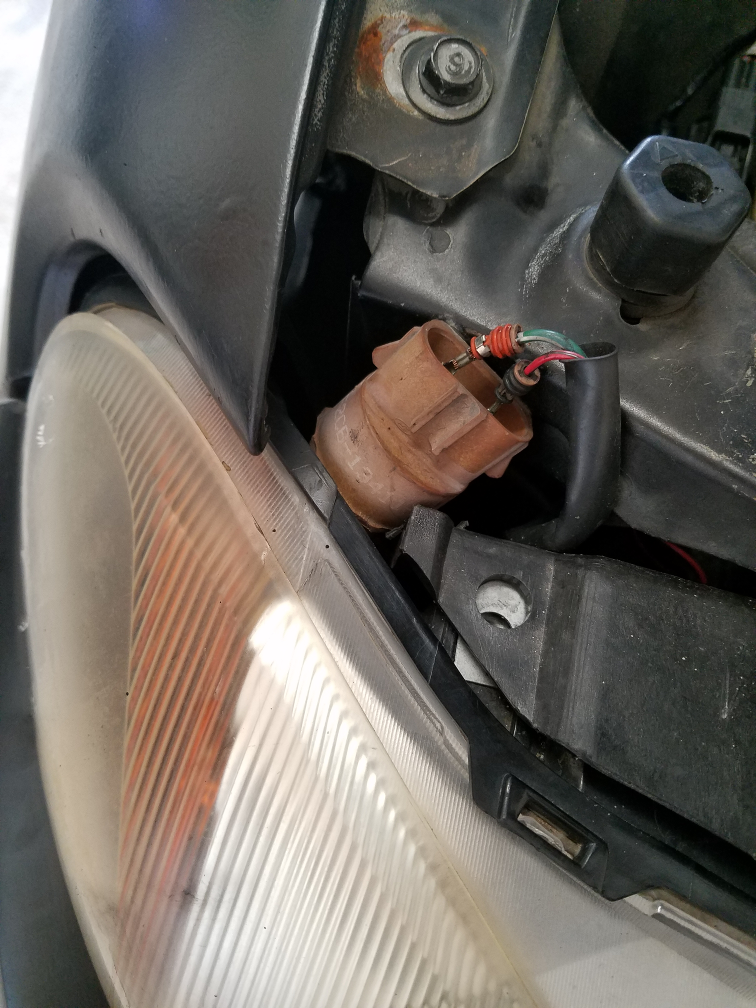
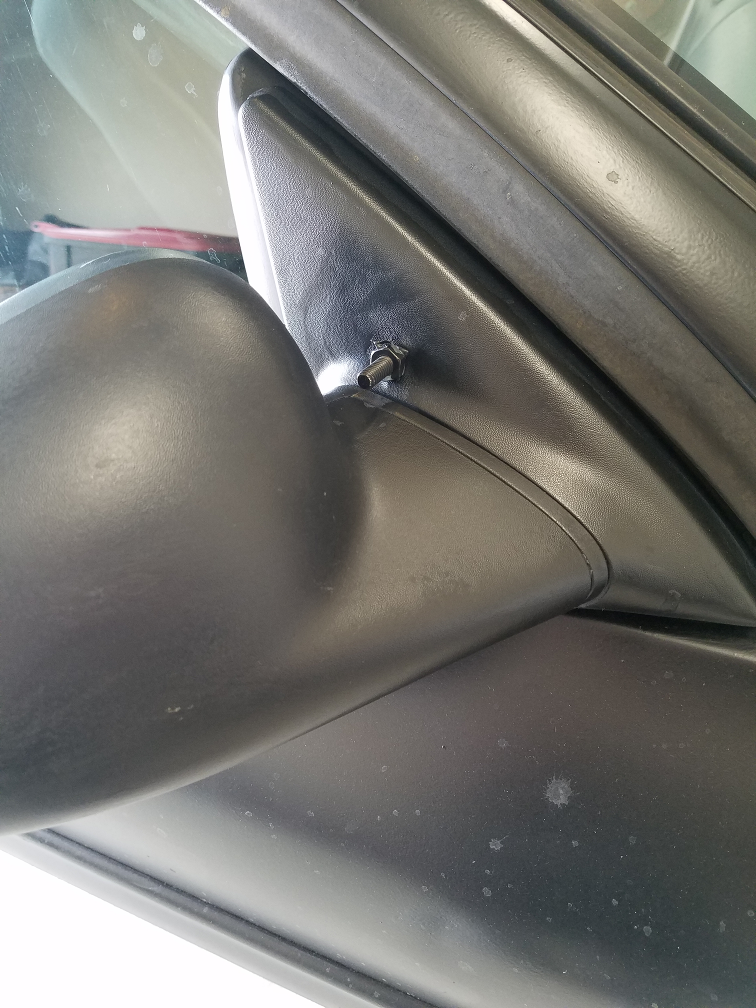
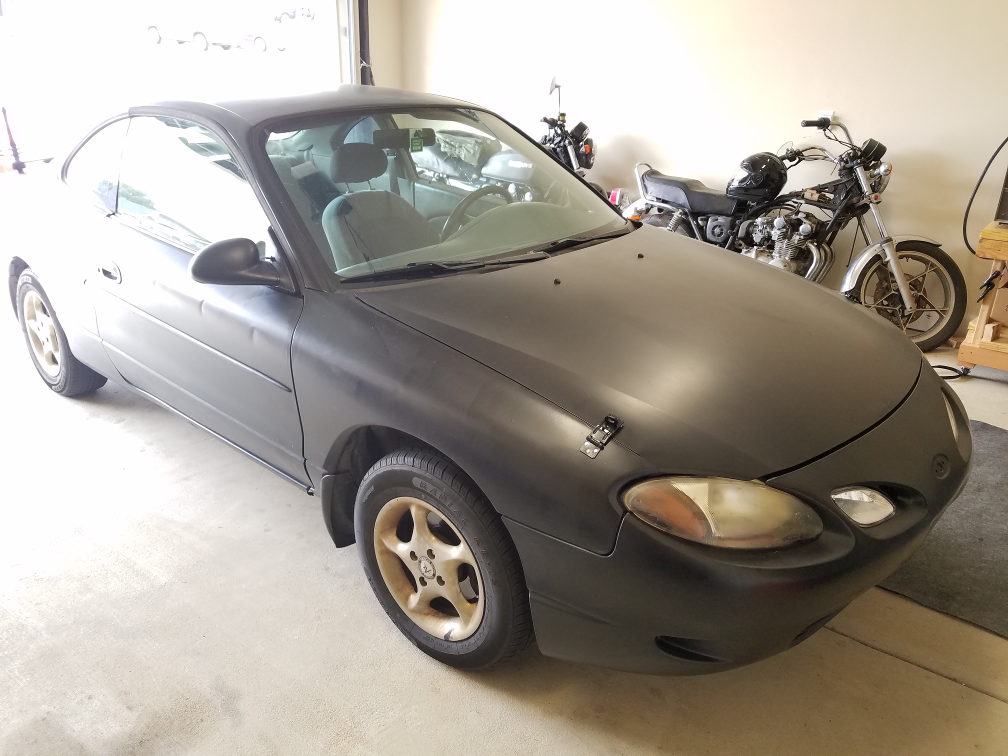
The replacement headlights from the junkyard did not come with bulbs. The original headlight bulbs were still intact after the crash, but the corner turn signal bulbs had been ripped away. Since I couldn’t find replacements, I drilled the hole larger in the back of the head light and managed to shove a larger bulb in there. The crash knocked off the passenger side mirror and as before, I reattached it with a nut and bolt after drilling a hole through it. The last picture shows off the new paint job I applied to the whole car with a black tractor paint and a paint roller, after sanding of course.
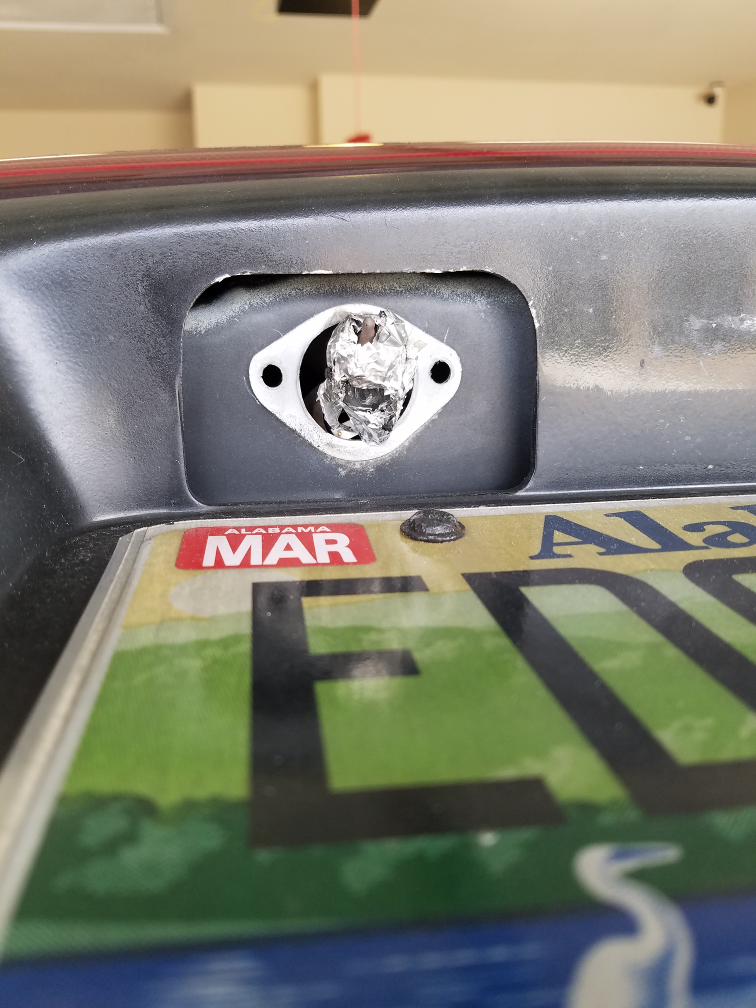
From this point forward, the modifications made are unrelated (at least directly) to the crash of 2018. This photo shows my solution for a license plate light. For the last few years I had a short LED strip glued above the plate but eventually the weather destroyed it. In a pinch, I spliced the wires to a spare headlight bulb and put it through the holes in the trunk. The bulb could be distracting to other drivers, so I wrapped it in foil to block the rear-shining light. Then I cut a small hole to allow light to illuminate the plate. It’s crude, looks awful, and I don’t expect it to last very long, so I will eventually put in something more robust.
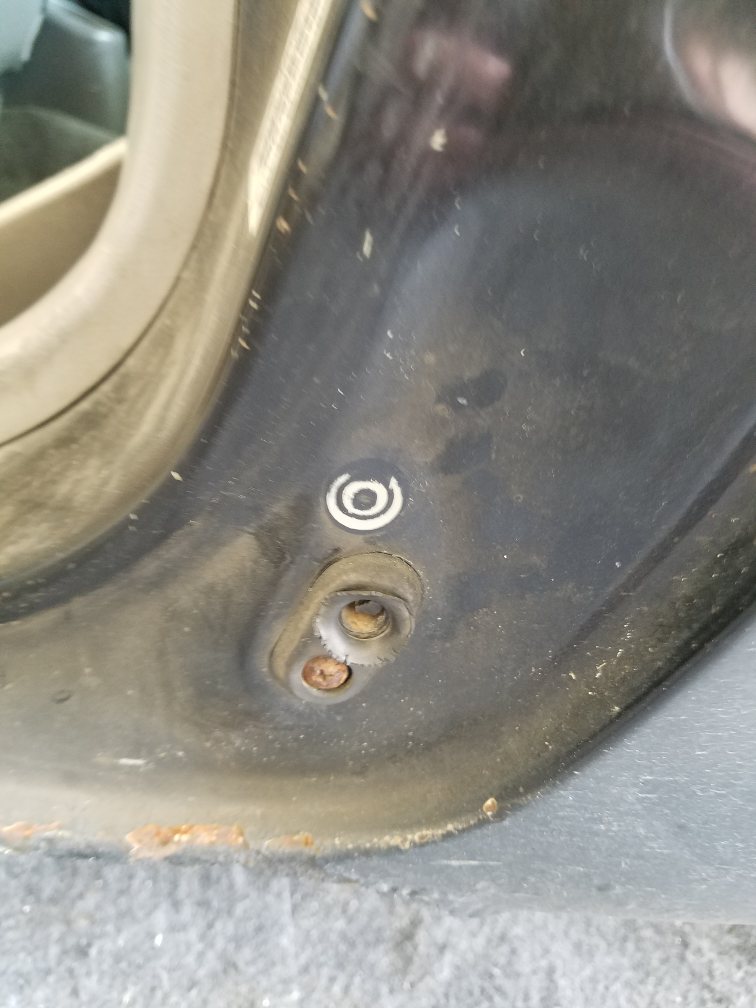
This is a photo of the body where the driver’s side door closes. This is the spot for the switch that detects when the door is open. One day, the switch broke and fell apart. Now the car usually believes the door is open, which means I can’t leave the interior dome light in the “door” position without running the battery out. It hasn’t been a big issue to leave it in the “off” position instead.
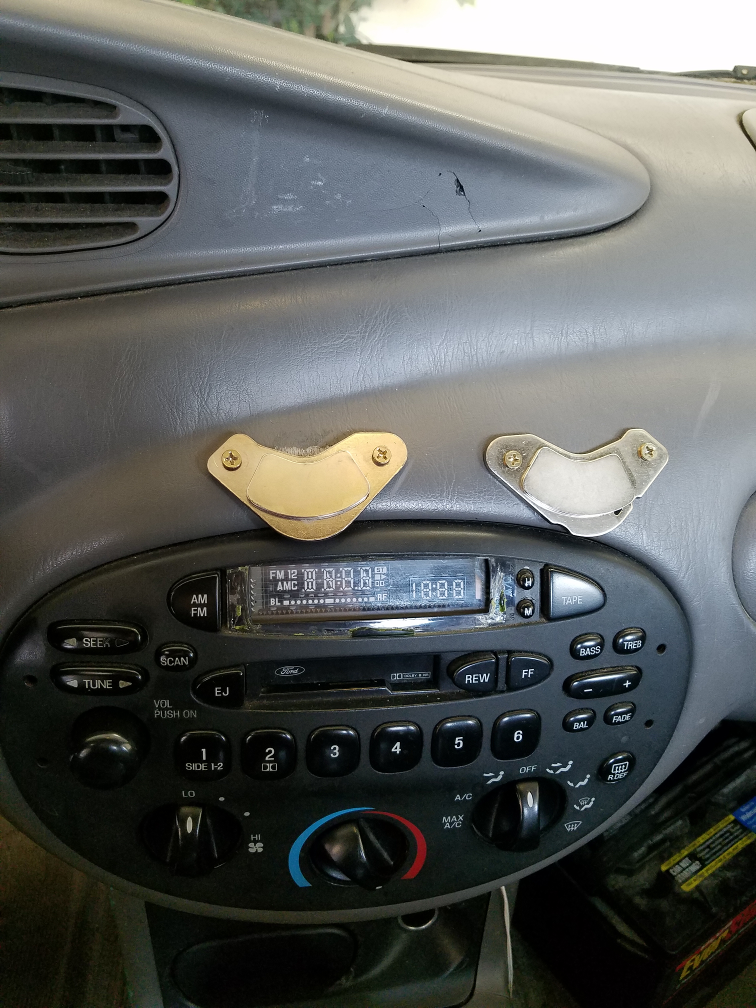
This photo shows the hard drive magnets I have screwed into the dash above the factory radio. I have two mobile phones, a work phone and a personal phone. Each phone has a thin case and between the cases and the phones, each has a thin sheet of steel. I can now rest phones on the dash while driving and the magnets hold them in place, thanks to those thin sheets of steel. This photo also shows that the plastic cover over the radio display is no longer there.