To make figures for publications and for general plotting I use Ion Vasilief’s QtiPlot. I find it allows excellent control of 2D plot formatting. By customizing some settings, it’s easy for me to import ASCII data from almost any file format which is important to me since I use a variety of instruments and each one exports its data in a different way. It has a fair set of data analysis tools, too, and is extensible using python, something I’ve written about before (see here and here).
Despite its many advantages, I was disappointed in the graph export implementation. For everyday general plotting and printing, I’ve been content to export my figures in the png (portable network graphic) format. Research journals, though, require plots to be created at high resolutions, usually 300 dpi or above. The export graph dialog allows export to many formats and allows one to set the desired size and resolution. For me, these settings do not work as expected and prevents me from directly exporting high resolution figures. I’ve developed a simple “work-around” to accomplish this so that I can continue using QtiPlot as my primary plotting software.
Below I describe the problems I’ve encountered with exporting graphs in QtiPlot and the solution I’ve found. Please note, I’m currently using version 0.9.8.9 svn 2288. The bugs and solution presented my not be applicable to newer versions.
Problems with QtiPlot’s Export Graph Features
I haven’t bothered to browse the source code, so I won’t attempt to guess at the root causes of the “bugs” I’ve found. Instead, I’ll focus on describing what I see as the expected behavior and the actual behavior from QtiPlot. I will illustrate the problems with a few quick examples.
Example 1:
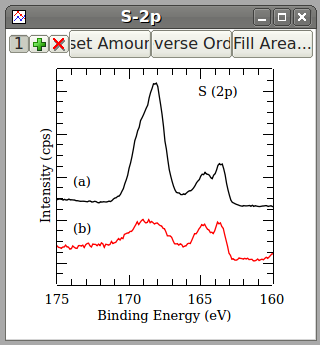
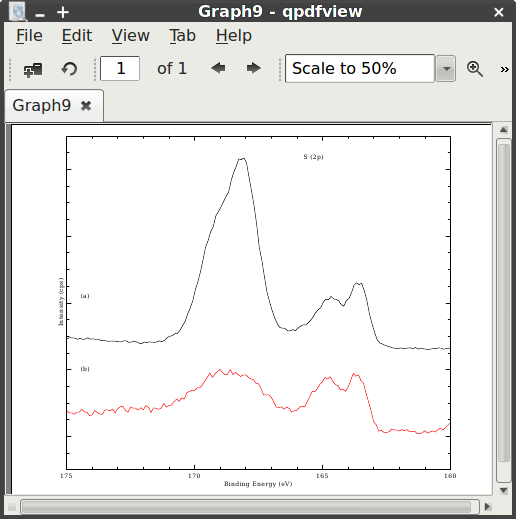
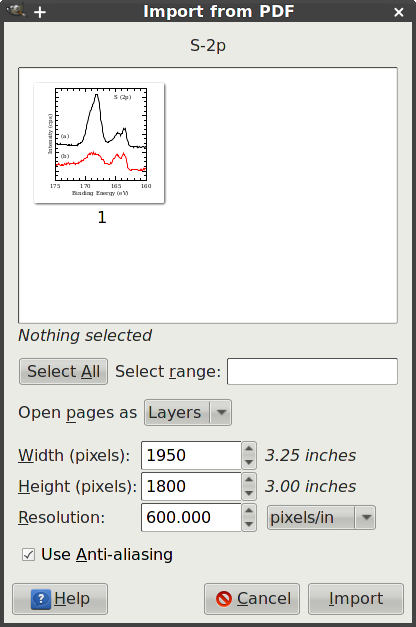
Let’s say I intend to produce a figure that is 3.25 inches wide (standard column width for ACS journals) and 3 inches tall. To ensure a high quality figure, I want to produce my figure at 600 dpi. That means the final image, if rendered to a raster type format (e.g. bmp, jpeg, or png) will have a final size of 1950 x 1800 pixels².
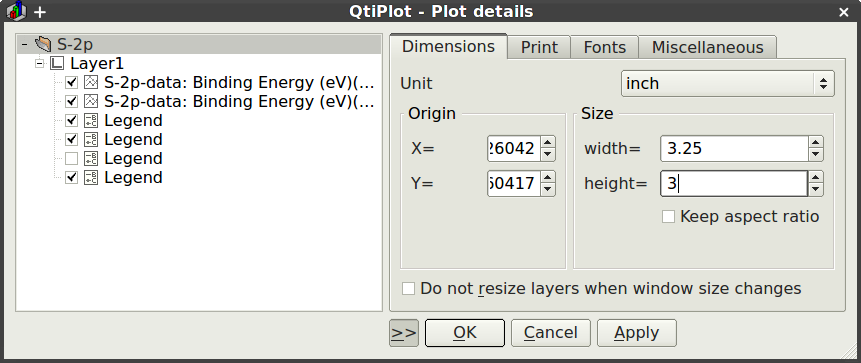
In QtiPlot, I make a new graph window and set its dimensions to 3.25″ x 3.5″. Why 3.5″? It turns out, the window size does not equal the final image size. Some of the window is occupied by the title bar, etc., and not by the graph. I’ve found that the final graph height will be about 1/2 inch less than the window height. The width does not have an easy relationship (though it does follow a y = mx + b relationship).
I add my curves and apply any desired formatting. Now I export the graph. I’ll try the png format first. The Export Graph dialog presents you with three options for the png format. I set the image quality to 90 and the resolution to 600 dpi. I’m ignoring the transparency setting for this plot. I save the graph.
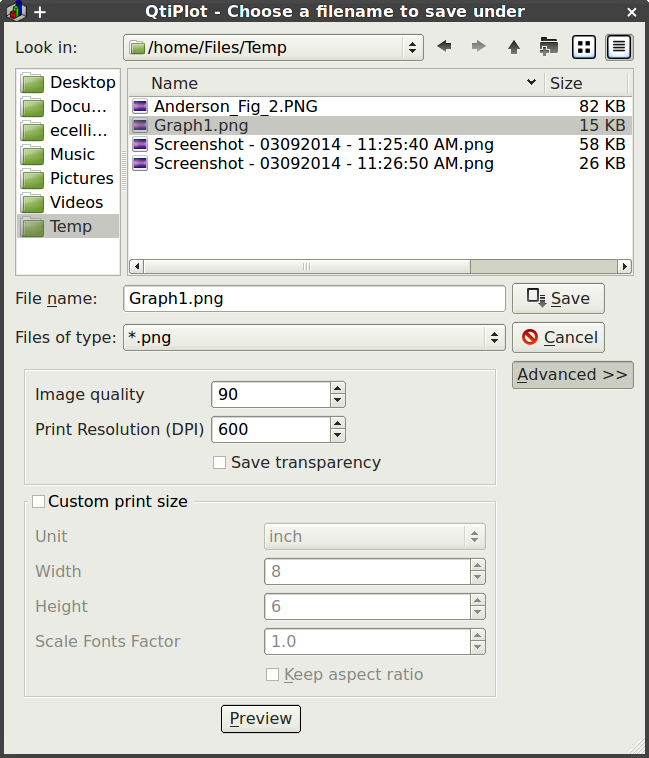
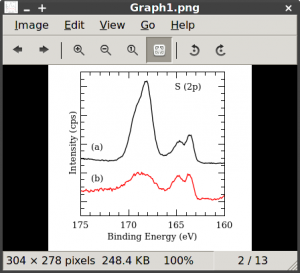
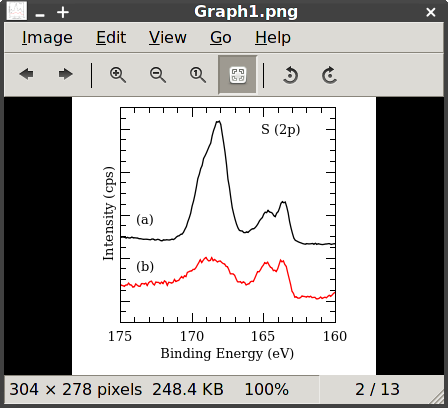
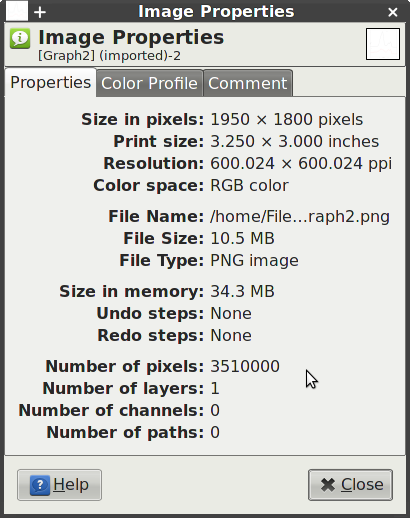
The exported image seems to look ok, but the size, in pixels, is too small, only 304 x 278 pixels². The GNU image manipulation program, or GIMP, provides more details.
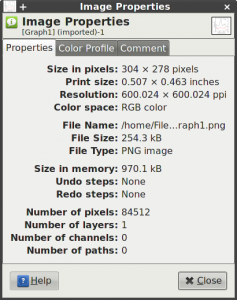
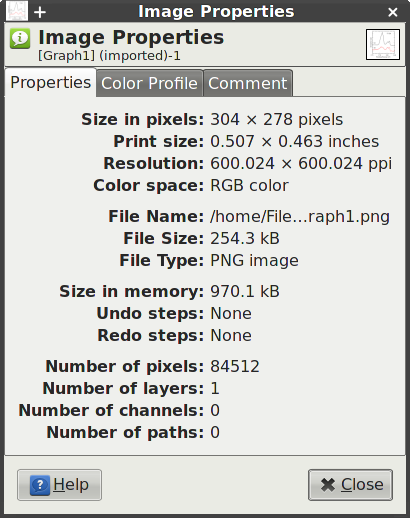
GIMP shows the correct resolution as 600 dpi but notice the image dimensions in inches are not correct. My image is only 0.507 x 0.463 inches². The math works out, though. An image with that geometry at 600 dpi would be 304 x 278 pixels². Perhaps there is an easy fix. On the Export Graph dialog is a second section allowing me to customize the print size. I set the custom size to 3.25 x 3 inches² and re-save the figure.
That fixed the size and resolution problem. I now have the correct dimensions in inches and pixels. The only trouble is, the graph is no longer rendered properly. All lines are too thin. All fonts are too small. In the Export Graph dialog, perhaps you noticed the “Scale Fonts Factor” setting. Since 3.25″ is roughly 6.4 times bigger than 0.507″, perhaps I only need to scale my fonts by a factor of 6.4. I make this change and export a new version of my figure.
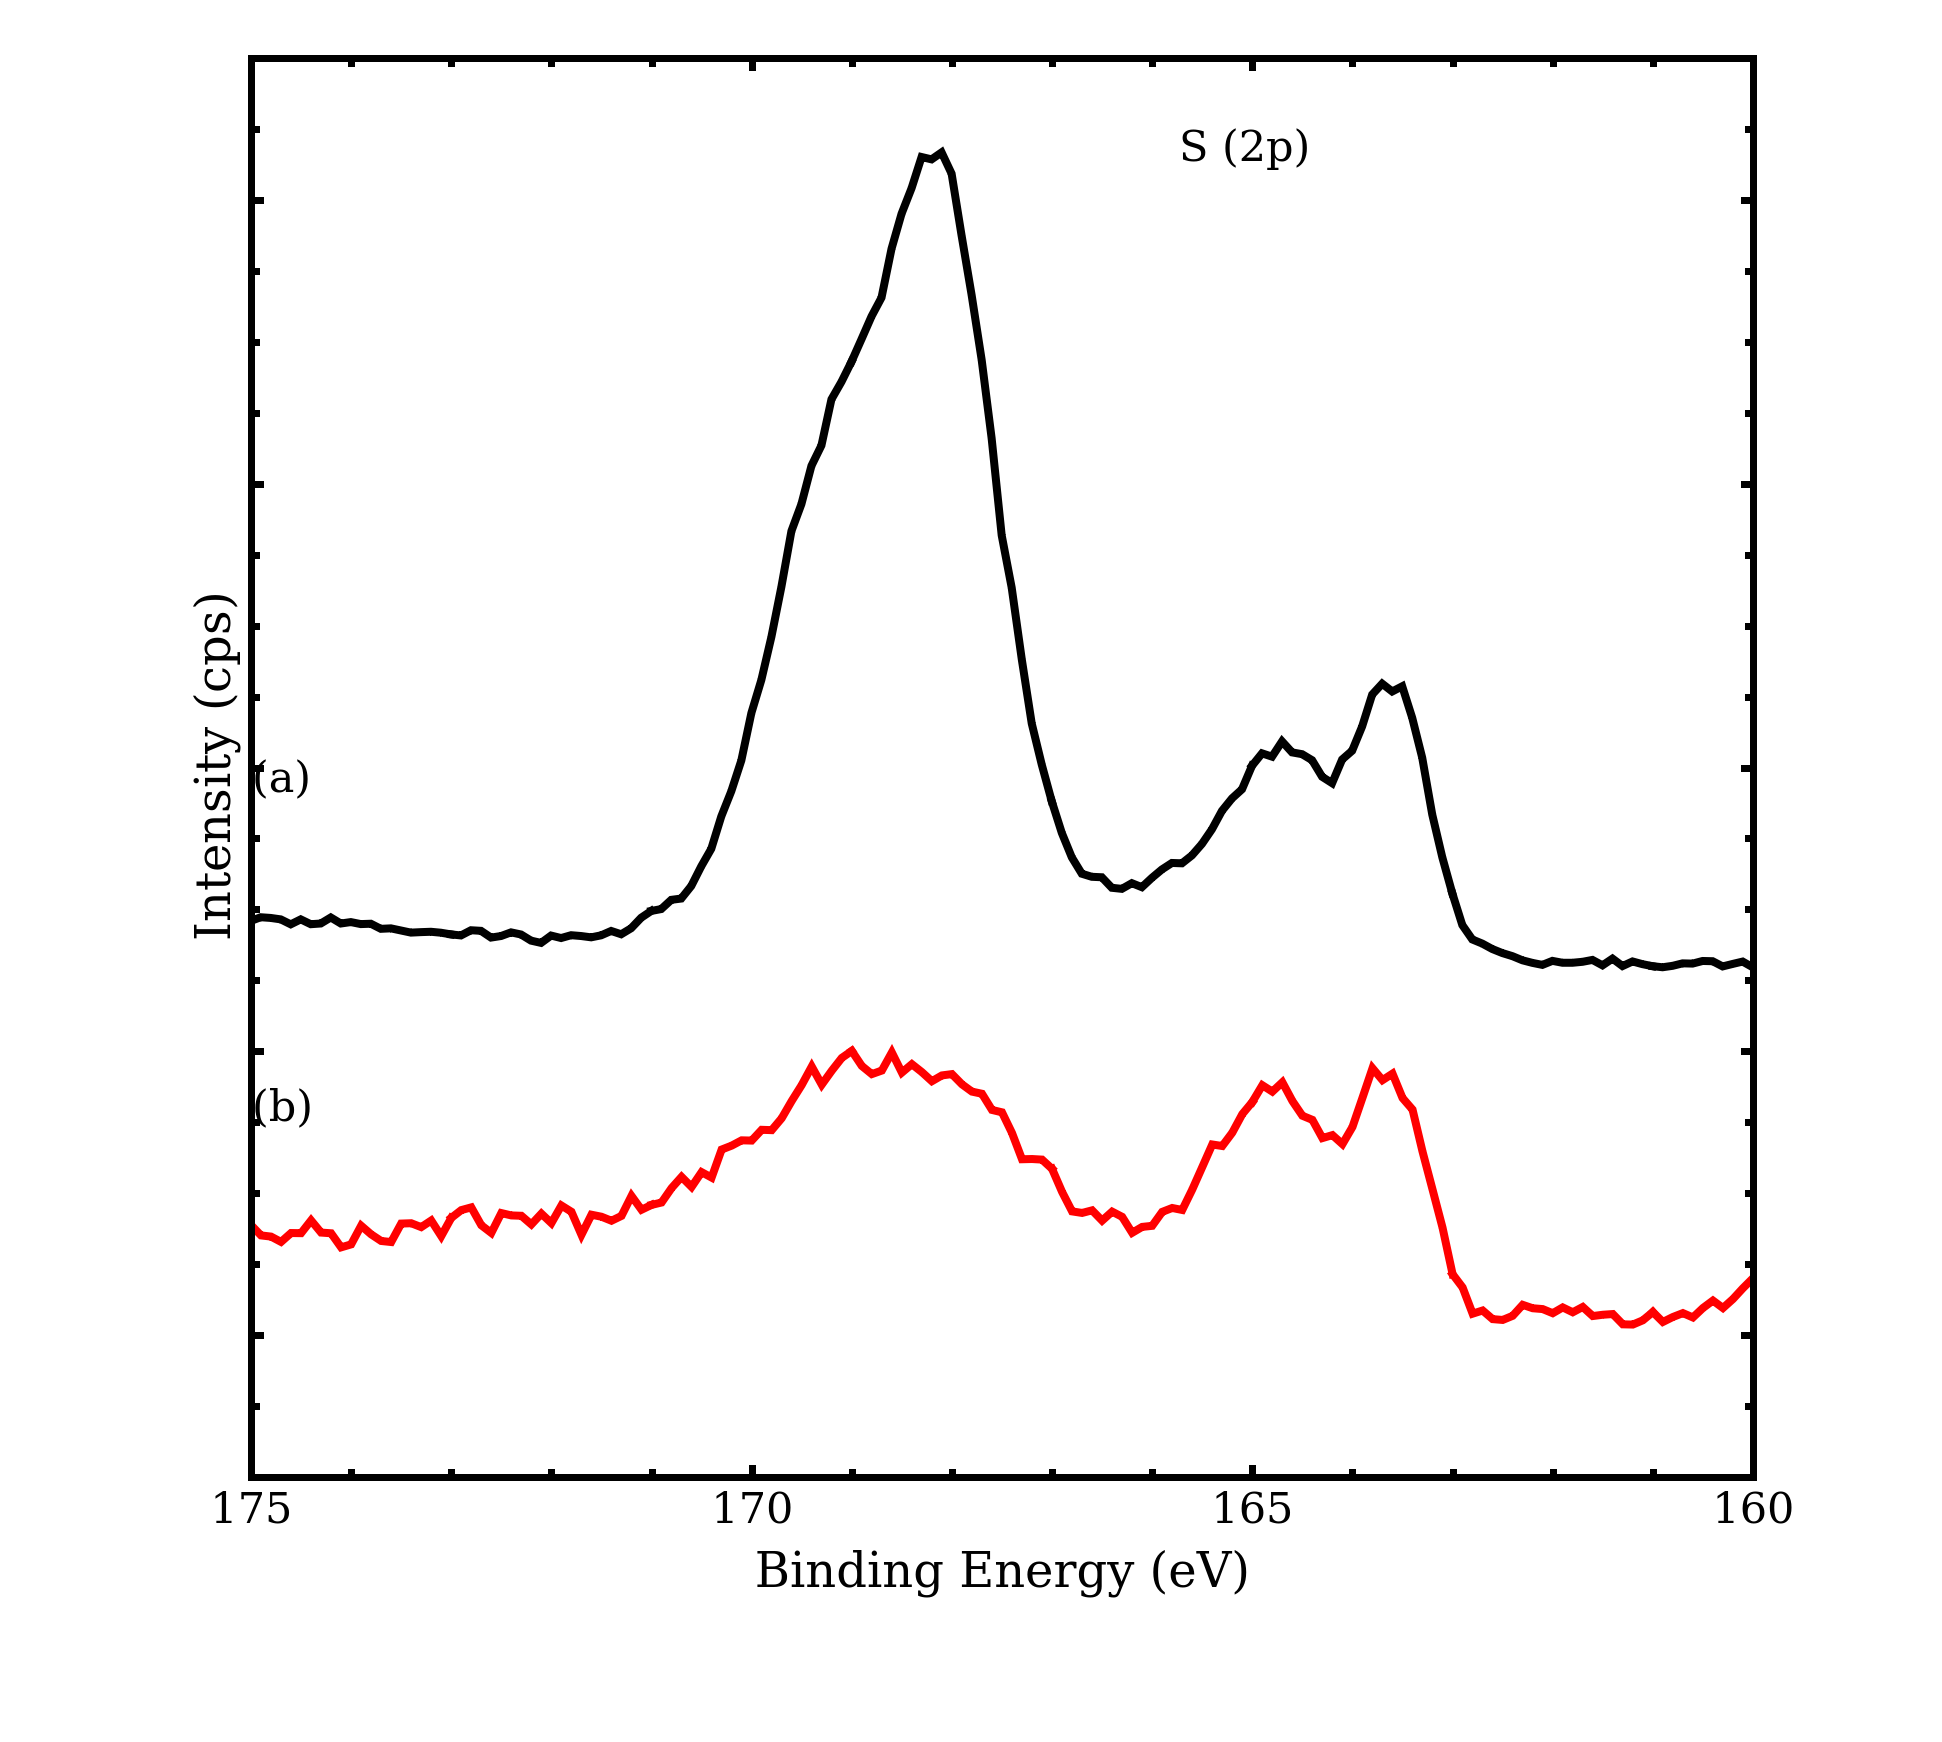
This is closer. The fonts are closer to the correct size; the dimensions and resolution are correct. My text for “(a)” and “(b)” have gone missing. The lines and curves are still too thin. There are no other settings to change in the export graph dialog. A solution might be to increase all line thicknesses by a factor of 6.4 and try moving my text around until it exports in the right position. I’ll just say now that this is nearly hopeless. During design, such enormous line widths make your plots unreadable and no one wants to use trial and error to align text boxes.
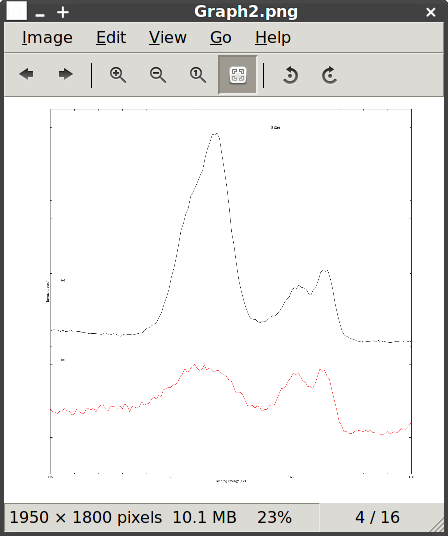
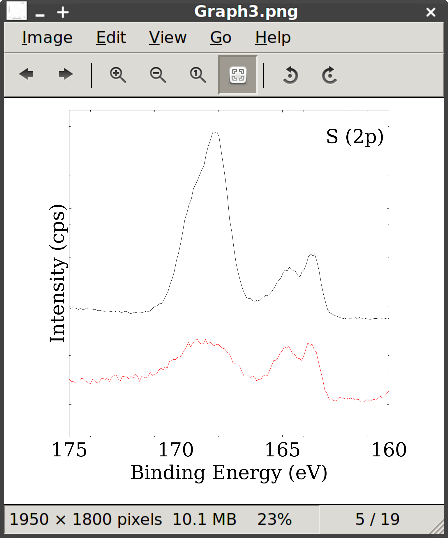
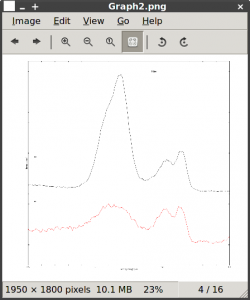
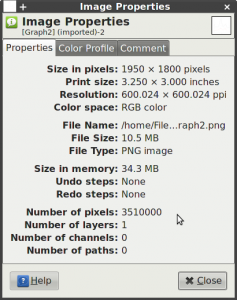
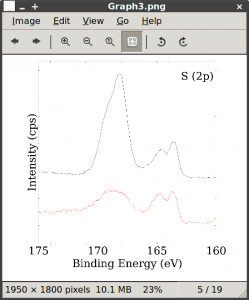
There is one other approach left. My experiments tell me that to get the font and line widths correct, the resolution of the exported image needs to be set near the resolution of the image on the screen. For me, that is 96 dpi. That is, my 3.25 x 3 inches² figure occupies 304 x 278 pixels on my screen. If I want my plot to export at 1950 x 1800 pixels², I should set my graph window size to these dimensions in pixels. Now, in the QtiPlot interface, my graph window is so enormous I can’t see much of it on the screen at one time. But, by increasing my fonts and line thicknesses and exporting to png at 600 dpi with no custom size, I get something very close to what I wanted.

This isn’t bad, but makes working with graphs in QtiPlot extremely cumbersome, and there is still some trial and error left in adjusting font sizes and line widths. Also, the file size is 10 MB. This might be reduced by changing the png image quality on export but I haven’t experimented to be sure.
Example 2:
Now let’s say I have my same 3.25 x 3 inches² figure (window height is 3.5″, see above) but this time I try exporting to pdf, a vector image format. The Export Graph dialog lets me choose a resolution and a choice to export in color. A resolution setting doesn’t make sense for vector graphics and indeed, I’ve found it has no affect on the exported pdf. This setting might only apply to figures that contain embedded bitmaps. I set it to 600 dpi anyway and export.
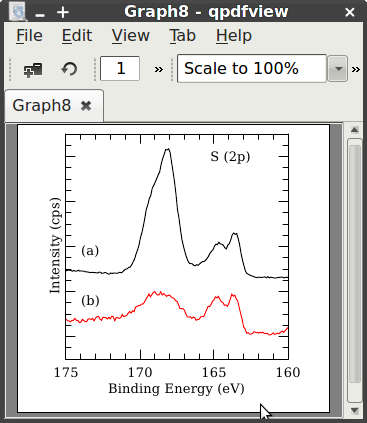
Now we’re talking. The graph, at first glance, looks great. I was able to design my graph with a reasonable window size and didn’t have to tinker with font sizes or line widths. The pdf document dimensions don’t quite match the window dimensions. That’s an easy fix though, I can set the custom size in the Export Graph dialog to tweak it.
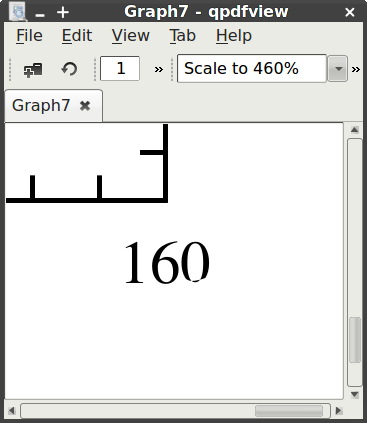
There. I now have the right dimensions. But wait a tick, something seems wrong with those zeros.
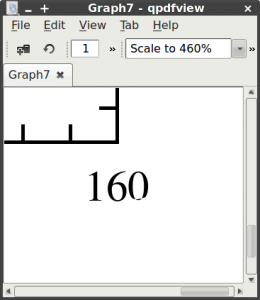
So close! The font choice seems to be the problem. In this case, I’ve been using Free Serif and Free Sans. If I change fonts to Serif and Sans I get a perfect looking figure.
What about resizing? That is, say I want to have big windows with which to work in QtiPlot, but then export my graphs in a different size? Or, what if I were to export my 3.25 x 3 inches² figure at a custom size of 10 x 8 inches²?
I’m back to the same problem I experienced with rastered formats. My fonts are too small and my lines too thin.
Conclusions and Solution:
From the above examples I’ve learned the following QtiPlot behaviors concerning designing and exporting graphs:
- Graph window dimensions do not equal the final figure dimensions. The final dimensions will be a bit smaller because the non-graph elements of the graph window will be excluded.
- To successfully export rastered images directly it is necessary to work with the graph window at the same size in pixels as the desired final image. For example, if I want a 3.25 x 3 inches² 600 dpi final image, my graph window dimensions should be 1950 x 1800 (approximately, due to the first point above).
- To successfully export vector images directly (like pdf) it is necessary to work with the graph window at the same size in physical units (inches) as the desired final image. For example, to get a 3.25 x 3 inches² final graph size my graph window should have these same dimensions in inches (approximately, due to the first point above).
- In either case, rastered or vector, the custom print size should be set to ensure the desired final size is correct, but note this only works if your graph window dimensions are set very close to the desired final size.
The best approach that I’ve found is to avoid rastered image formats because it is nearly impossible to work with graph windows of the same dimensions (in pixels) as the desired final image (point #2 above) unless you require only very low resolution. Instead, always work with graph windows close with dimensions (in inches) close to the desired final size and export to a vector image format like pdf. This will produce a document with the correct dimensions and an infinite resolution since it is not a rastered format. Check your fonts to be sure they will render correctly and set good ones as your defaults.
This approach makes great pdf images but sometimes you need a rastered format such as when inserting figures as pictures into word processing documents (e.g. LibreOffice Writer, MS Word). In this case, I use GIMP to open the pdf images and convert to png. Upon opening, GIMP will ask you to specify a desired resolution and based on the document size will render the image with the correct dimensions in pixels.
Of course, if you require any other kind of resizing, GIMP has this capability too, but it’s best to import the full size image into your word processing document and let the software scale it for you there.