Eventually the Edscort will have its own page, but until then, a small introduction is in order. The Edscort is a 1998 Ford Escort ZX2. We have a long storied past and I have no plans to change vehicles ever. So, when something breaks on the Edscort, and it is something necessary for continued safe operation, it gets fixed. This post details how I went about repairing a broken wiper switch.
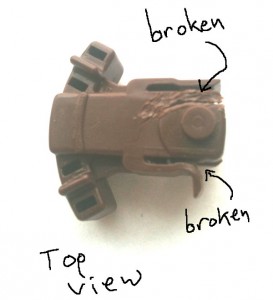
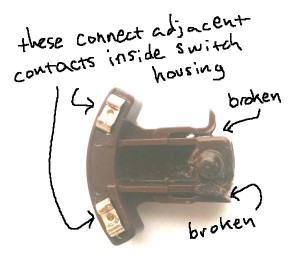
It’s not important how the switch broke, but it involved significant force being applied to the long wiper switch handle protruding from the steering column. The leverage broke the small brown plastic component inside the switch housing as well as the plastic handle itself. Initially I was able to “plastic weld” the brown piece back together and rejoin the the two pieces of the plastic handle by screwing them into opposite ends of a hex nut coupler. Eventually though, the plastic weld gave out and the switch was inoperable again. I would have to do a complete rebuild.
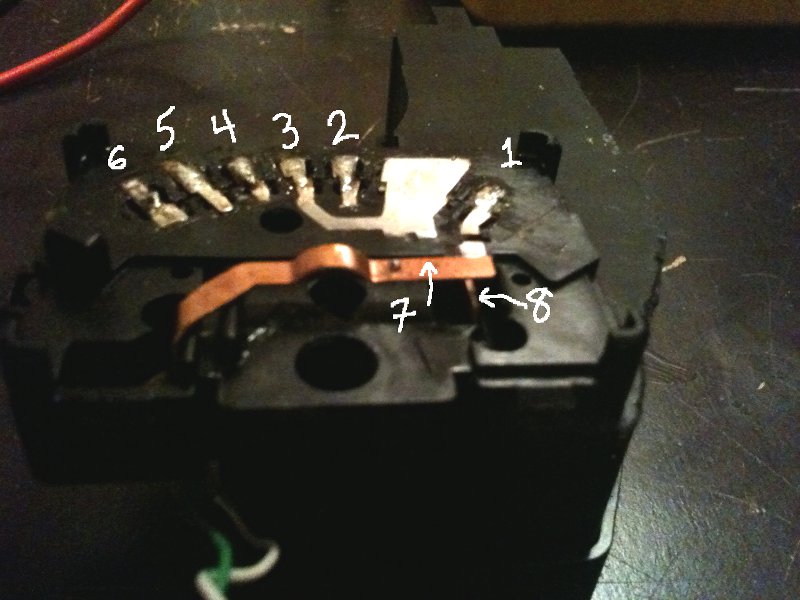

By studying the inside of the switch I was able to determine that the small brown plastic piece rotates to make and brake the connections in the following manner:
- OFF = 5 + 6(4)
- VARIABLE = 4(6) + 5, 1 + 3
- LOW = 3 + 4(6)
- HIGH = 2 + 3
Where the numbers refer to the contacts as shown in the photos and diagram. Using a multimeter I determined that contacts 4 and 6 were electrically connected, as were contacts 3 and 8. This would prove useful as it reduced the number of wires I needed from 10 to 8, the same number found in a length of CAT5 cable. Because there are four settings, I would need at least a 4-throw switch. I ended up ordering a 3-pole-4-throw switch from ebay. It would turn out that a 2-pole-4-throw switch would have worked as well, but I think the 3-pole switches are more common. But note: if you order a rotary switch, do yourself a favor and get one that comes with a knob. I didn’t and regretted it later.
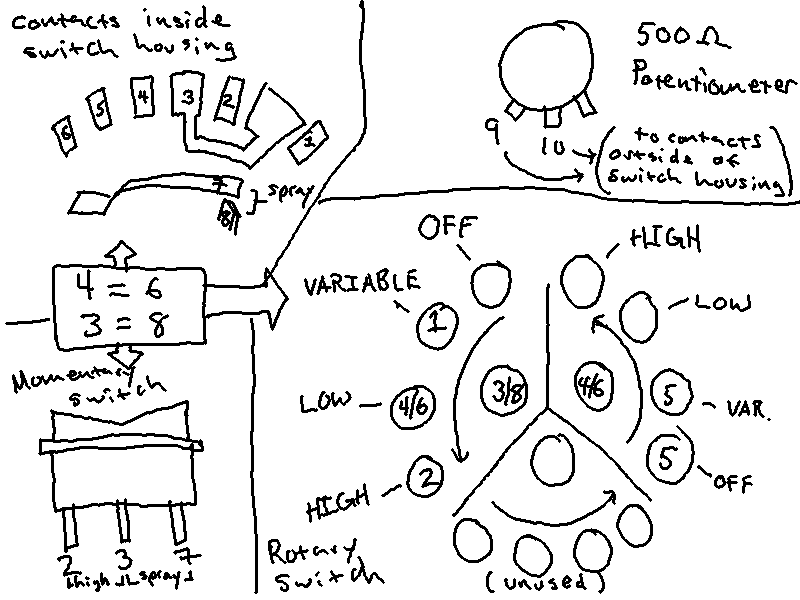
The diagram above shows how the connections were made to the rotary switch. There are two more contacts on the outside of the switch housing that originally ran through the middle of the wiper switch all the way to the turn knob on the end. The turn knob is simply a 500 Ω variable resistor. I opted to replace this with a 500 Ω potentiometer (got a knob this time!).
The spring contact inside the switch housing connects contacts 7 and 8(3) and activates the spray wash. I wired these to one circuit of a two position momentary switch (SPDT?). The switch has three contacts which are all disconnected in its un-pressed position. When the rocker is pressed one way, it connects the middle contact and one of the end contacts. When pressed the opposite way, it connects the middle contact to the third contact.
There is one remaining function of the wiper switch that I haven’t mentioned. When it was operational and the handle was pushed up, the wipers would come on at their highest speed momentarily.
- MOMENTARY HIGH = 2 + 3(8)
Since contact 3(8) was already used in the momentary switch for the wiper spray, all I had to do was connect contact 2 to the third and unused contact of the two position momentary switch. Now, when pressed one way the sprayer would activate. When pressed the opposite way, the wipers would come one momentarily. In practice this worked, though there is a slight delay before the wipers come on and the speed isn’t as high as one would expect. I’m sure this is because the rotary switch is in the on position. In other words, I have the MOMENTARY HIGH position wired as follows:
- MOMENTARY HIGH = 2 + 3(8), 5 + 6(4)
I decided its function was good enough. If I really need high speed I can turn to that position on the rotary switch rather than use the momentary rocker switch.
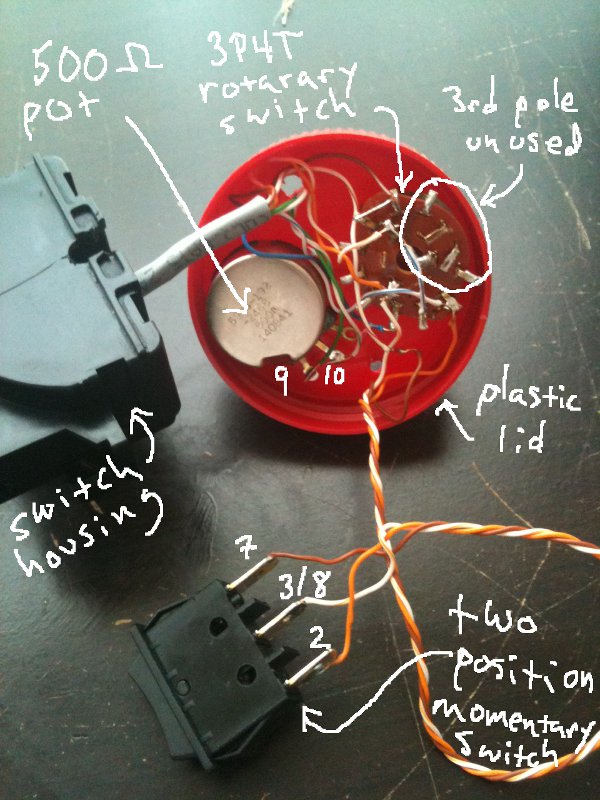
With everything working I had to find a way to mount everything to the steering column. I wasn’t able to mount the switches directly to the plastic housing around the column because it fit so tightly (no space inside). I had to mount everything externally. I opted to use the plastic lid of a jar of peanuts because it had the right depth. I used drywall screws to screw the jar onto the steering column’s plastic housing. The CAT5 wire was a good choice because it was relatively thin. There was no extra room for fat wire.
Disappointingly, I found that my momentary switch was to big to be mounted directly to the steering column housing. I ended up cutting a hole through the housing to run the wires and then hot-gluing it flat to the top of the housing. It’s ugly but should work (at least until the summer heat deteriorates the hot glue). Eventually I will replace this switch with a much smaller (less tall) version and mount it directly to the steering column housing. Actually there is probably enough room left on the red plastic lid to mount some tiny push button switches, though it might be a challenge to find ones with high enough ratings.
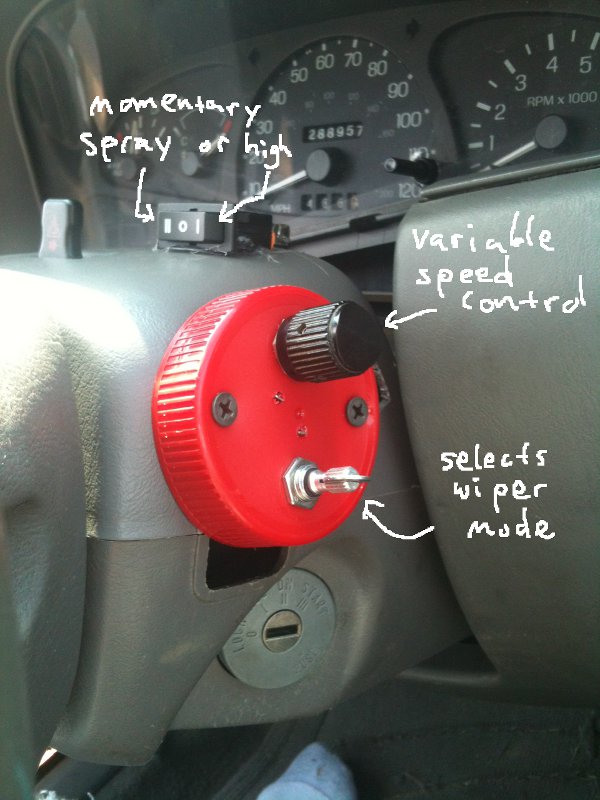
The final product is shown mounted in the Edscort. You’ll see that for the time being I’ve had to resort to jamming a washer in the slot of the rotary switch until I can find a knob that will fit. But hey, it works, and there is no long wiper switch handle to get in the way of things.


